Quantcast
Channel: Gayle Ortiz
Viewing all 115 articles
Browse latest View live

Making It Work

$
0
0
 What I love about sewing is that I can make myself new, every-day clothes that work for my body shape, my lifestyle and my ever-changing tastes.  And then, I can also make weird, one of a kind, arty garments that I'll probably only wear once or twice but enjoy the creative part of making them.

Today's post illustrates both of those types of projects.


I was really taken with a friend's version of Marcy Tilton's v9171 pattern.  And since I had it in my stash, and had a nice 3 yard length of her Taupe Bon Mots Stretch Cotton on hand, I set to work.

I cut out a large, should have cut a medium; this pattern is roomy.  But, after finishing the whole thing, I ripped out the center front seam, took two inches out of it, and it looked lots better.

But, I still didn't love that huge expanse of grey across my chest, I'm wide up there and thinner from there down!  I needed another component.  I've always wanted to make Diane Ericson's Fault Lines vest and it seemed like the perfect way to break up the bodice and overall shape of the bell-like tunic.

I'm really happy with the way this turned out and I'll wear them together often.  I'm also going to buy a medium in the tunic pattern because I want to make it again.  It's fun to make and so wearable.

One of the great things about the vest pattern is that it takes so little fabric.  I used remnants for the both the lining and the outside.  The horizontal stripes are from a knit cut so it rolls and a little piece of a stretch woven. I had to put them on because, after I got the whole thing sewn, I realized there were two blemishes on the front that I needed to cover up.  But it worked and added interest.

I like the vest pattern because you can tailor it to your size very easily since the side and back seams are overlapped after everything is finished.  That method also lends itself to hand stitching.  Next time I make this (and I will) I might cut the shoulders a bit narrower.  Although I'll wear it a few times before I make that decision.

I did a lot of hand stitching on this piece. 

Before deciding to make the vest I auditioned a couple of scarves to break up the front.  I liked the idea but it was a good excuse to finally make the vest.

Another scarf idea.  I like them both, will probably wear it this way, too.  This one gets some color into the mix which is good.

And speaking of color...
I started this vest a year and a half ago in a Holly Badgley class.  The fabrics are a canvas and a muslin I dyed turquoise, some of my hand painted canvas that I washed in the washing machine to soften, chartreuse cashmere pieces and orange kantha cloth scraps.

This hung in the UFO files while I tried to see if I even wanted to finish it.  It's pretty wild and I don't think I'll wear it more than once, if that.  But I finally decided to see it through just for the art sake of it.

I did get a lot out of making this vest though.  The biggest lesson is not to add a lot of accent pieces since the overall fabric is so wild.  I had lots of scraps laid out to audition and finally chose not to use any of them.  Just the orange and chartreuse that I already had on the piece worked fine.

The kantha scraps add a lot of texture and immediate age...like this garment needed that!

I made a barbed wire silk screen in a class a couple of years ago and used a scrap of that on the lower back.

It has one pocket I hid in the patchwork.  This is one crazy garment.  I might wear it, I might sell it.  The jury is out.  I looked at it for so long I feel like I'm kinda over it by now!

And finally, here is a little gizmo a friend bought me at Eddie's Quilting Bee in Sunnyvale, CA.  I've used it about a hundred times since I got it.   This is a miracle of a little thing.  It's magnetic so it gloms onto your needle plate wherever you need it, making a perfect guide for the fabric.  Since I can't sew a straight line to save my soul this thing was MADE for me! Thanks, Lisa!!
Happy Labor Day Weekend everyone.  I'm headed to the bunkhouse to sew.


SaveSave

Full On Fall

$
0
0
I've had a super busy fall season.  First I attended another Boro class given by Jody Alexander.  Then I took a wonderful eco printing class from Pia Best- Reininghaus sponsored by the talented felter, Marilou Moschetti.  That was fun and I learned a ton.

THEN,  I had an annual sewing retreat in San Juan Bautista with 19 of my dearest sewing pals.  And finally I went to Ashland for DOL (Design Outside The Lines) with Diane Ericson.

She is on fire right now with all new ideas and designs using remade clothing, making components for garments and designing new garment patterns.  I love everything she does.

 Marla Kazell was the guest instructor.  I wanted to take this particular DOL (not that I want to miss any of them!) because Marla would be showing couture techniques she uses in her Koos Van Den Akker-inspired jackets.

She's a terrific teacher, too.  I learned a lot from her.  She's very patient and is really there for her students.  I learned how to make triangular bound buttonholes that you'll see further down in this post.

It was full on fall color in Ashland.  My husband and I rented a condo right in town and had a great time wandering the shops and eating in the fabulous restaurants.  He took in a play and toured the three theaters since he is a playwright himself.  I just took in the sewing design magnificence in the Ashland Springs Hotel workroom.

Just a little glimpse of the fall color.  I regret not taking more photos, it was so beautiful.  


 Diane has a studio in town where we visited one afternoon to paint fabric and schmooze with Miles Frode,  her artist son who paints incredible canvas for making one-of-a-kind garments.  He's also begun making very cool coat pins.

This jeep was on the way to the studio and I had to stop.


 These candy colored trucks are one of my favorite things about driving up to Ashland.  They sit along Highway 5 and give me a belly laugh every time I see them...whaaat??

I came home with two partially completed jackets.  The fabric for this first one is from a double sided cotton; woven on one side with a bit of a waffle to it, and knit on the other.  It's a unique grey-khaki color.  I used Diane's Ventana Jacket pattern.  One thing I like about Diane's patterns is that you can adapt them in so many ways.  I didn't do too much to this one, just fiddled with the pleats and darts a bit and added a pocket to the other side.  I gotta have two pockets...what do you do with your other hand?


The darts make it so you can fit the pattern easily.  I wanted it a bit snug in the back and full in the front.

 My second jacket was made using a very heavy upholstery type fabric from Marcy Tilton.  The pattern is B5891 by Katherine Tilton.  I've used this pattern several times.   Here, I've lengthened it.  

I used three triangular bound buttonholes I made as samples with scraps of the fabric.  I liked the look of them sewn onto the garment so I went with that idea.  They're a bit wonky but I like the look.


The pattern called for in-seam pockets but I prefer inset pockets.   Inseam pockets always feel like they're set back too far for my comfort.

I decided to document how I make them, I hope this mini-tutorial helps if you've been wanting to try them.  Here goes...

First, I mark the position of where I want the pocket to be on the fronts. Using a rounded template I cut out the sides so that there is seam allowance both top and bottom.  The pocket itself should be larger than the opening by about 1/2-5/8" top and bottom.


I like to use a knit for the binding so that there is no need to cut bias strips, but if using a woven you will need about 10-12" of 2" bias cut fabric.  Pin the bias strips to the fronts, right sides facing.

I sew it on using a 1/2" seam allowance then turn the strip to the back, over the seam allowance (don't trim!) and top stitch it.  Cut away any excess on the back and edges.

Finished bias strip.

 I audition pocket shapes (I have several I keep in a file) to see which size and shape looks best.  Above I position it under the side front to see how it looks.  For this pocket back I used a gray velveteen that was stenciled by my friend, Sharon.  I used it for the buttonholes, too.


Before sewing it onto the garment I serge the edges of the pockets.

Sew it onto the garment right side of pocket to wrong side of garment.

Finally, I sew the side seam, being sure to catch the side edge of the pocket.


Close up of a wonky buttonhole.  Marla, I promise to get better at this!!


And here's my new baby.  A sweet little Singer Featherweight.  I bought it at a garage sale for $50!  Another $125 to tune her up and she's a gem.

Runway Inspiration

$
0
0
This last fall's Viktor & Rolf runway show blew my socks off.  I downloaded it over and over again to study the details.  I particularly love the use of denim but the whole thing just calls to me.

I made two efforts at using the weaving technique in the show to some success but, as with so many things that look simple at first, the real complexity of the design has eluded me thus far.

I'm not sure I'll work with it again but I might.  Here are the two pieces I made using their concepts.

The first is Diane Ericson's Fault Lines Vest.  I made it a couple months ago and love the lines.  It's a blank canvas-type pattern.  On the front I simply used scraps of a beautiful red wool.  

 On the back I applied the Viktor & Rolf weaving using scraps from old silk scarves.  The body of the vest is a black stretch woven so I was worried about stretching that might occur if I cut into it.  

I decided to weave the scarf scraps onto a piece of the fabric and appliqué the whole thing to the back.  It worked well and gives the same feeling as if I'd woven it right into the body of the garment.

 I secured each vertical strip with a line of stitching.

I thought the back needed another detail so I added a hint of color at the hem.

My next attempt was on a Levi vest I just bought from a sewing pal.  I kept it simple in the front, only using some of the buttons I inherited from my mother's massive collection.  

In the back I positioned the weaving in the center panel.  A sewing pal, Lisa, was smitten with this technique, too, and had finished a Levi jacket that I admired.  She placed the woven panel in the center back so I gave it a try.  She also lent me some Levy scraps because I have none...being the one who is  always trying to de-stash.  Plus, she gave me some really good tips to make the process easier, like pinning as you go and using an embroidery hoop if your fabric could benefit from it.

  Many of these denim fabrics were so stiff they didn't "bunch" as much as I wanted them to.  I like the thick and thin widths though, and the pieces hanging from some of the edges.  I like the results but would need to really work with this technique to get stunning results.  

Once again I'm reminded that couture fashion may seem frivolous at times but those exquisite techniques are borne out of years and years of experience in the ateliers.  

I admire the men and women who toil anonymously and I think they are, in great part, the reason for the success of the designers they work for.  But, I'm happy to see that some designers are beginning to publicly recognize these artists.  Karl Lagerfeld actually honored them in his fall 2016 runway show.

I'm so happy to wear this vest because of the buttons I used.  I've taken them out and played with them for years, wondering what I could ever use them on that would bring them to life and not be too precious to wear on a daily basis.

 I know some of these buttons like they are family members.  Finally, they have a life outside the button jar!

Holiday Weekend Sewing

$
0
0

I've had this entire weekend without a single plan except a wonderful raucous Thanksgiving dinner with 17 friends.  So what does that mean?  Time to sew-sew-sew...and listen to a book.  Plus, it's raining here on the Central Coast of California, finally, and it feels so good to sit inside and listen to the rain.

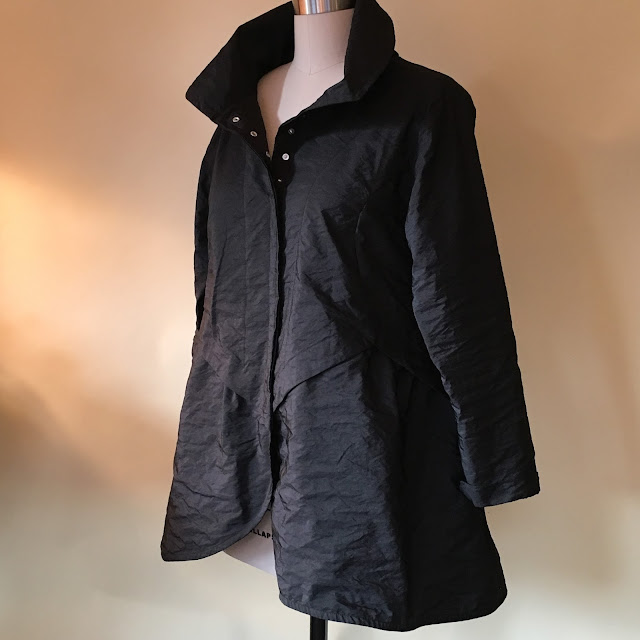
I finished Marcy Tilton's Vogue 9230 which I'd started a few weeks ago.  I loved making this jacket.

It's not easy.  And I wonder where Vogue lists the difficulty level now?  Is it the colored symbol?  I couldn't find it on the package.  That doesn't mean it's not there...I know someone will tell me.  I can't find it on their website either.  I think this must be average or maybe somewhat advanced?  It's tricky but fun.

I used a unique fabric that has metal woven into it so it has a strong opinion about where it wants to wrinkle, twist and turn.  It's easy to sew with but feels sort of like wearing armor!  It has every chance of being rain resistant but I don't think it really is, darn it.

The tricky part of the pattern is where the bottom pieces fit onto the top of the jacket.  It's do-able though, and is very unique.  I could see this being flattering on all kinds of figures.

Because of the sticky-outie nature of this fabric the bottom back pieces needed to have the pleats sewn down.  It worked fine and you may want to do that with the fabric you choose since there is quite a bit of volume in the bottom.

I love the collar, plenty of drama here.  I auditioned button after button but maybe I just have button fatigue or something, none of them seemed to work.

I've been wanting to use this snap tape for years now and it worked well on this fabric and shape.  
When I told my husband I'm going to get a lot of wear out of this garment he laughed.  What the...???  I couldn't figure that one out....but yeah, I will wear this often.  It's comfy and stylish, my kinda combo!

OK, here goes with this one.  Yes, this is a Diane Ericson Faultlines Vest, and yes, it's made out of men's slacks.  While I was at DOL last month one of the attendees brought in a big bag of fabrics to give away.  I swooped in and got several wonderful pieces, thank you Lucy!  Her husband's worn out khaki slacks were among them.  
I've had them on the dress form in every angle you could think of.  I knew I wanted them to be upside down.  Finally, the Faultlines pattern came to mind and it worked.  The layout was tricky.  I got almost all of it cut out in the fabric but had to use another fabric for two of the lining pieces.

Boy, men's wear is made so that it will survive any disaster you throw at it.  Just "unmaking" these pants took hours.  

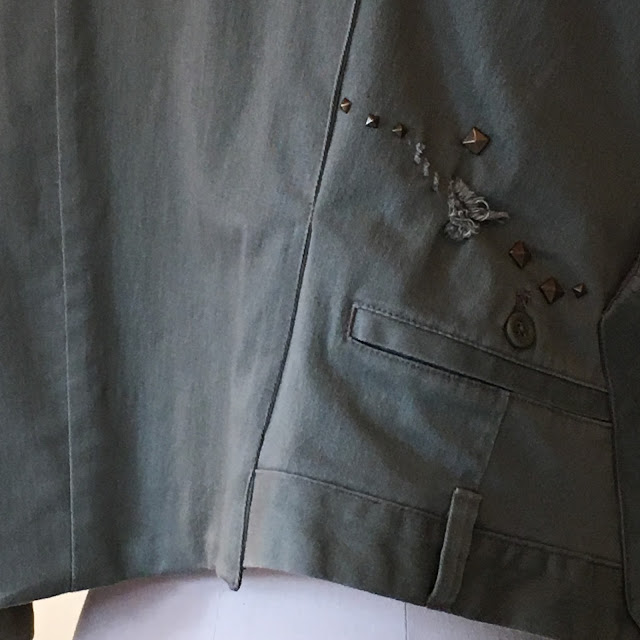
I wanted the vest to be as lightweight as possible so I took out all of the pocket linings.  I also ripped out the clothing designer's symbol and put a bronze stud in it's place.  You can see it just below the upside down pocket.

I think the fly is hysterical.  It will be interesting to wear this and see what people say.  Will they notice?  Will they say something or just walk away...??


You get a glimpse of what's going on in the back here but...


Here's the close up.  There was the hole just below his back pocket.  That's probably why he threw them out.  I didn't feel compelled to cover it.

I just couldn't think of anything that would look right so I left it.  Finally decided to use more studs to bring even more attention to it.

I'll give this puppy it's day out soon and then decide if I really want to wear it.  The process alone was fun though!

I hope your holiday weekend was full of the things that make you the happiest, whatever that might be.

Article 0

$
0
0
It's been a busy fall and early winter around here.  This post will be a grab bag of all the things I've been doing and working on.

Here's the latest version of a pattern I've made three times now.  It fits me to a T, I love making it and I can now whip it out in about four hours.  It's Marcy Tilton's Vogue 9130.  I think this could be flattering on lots of figures.

This fabric is a heavy cotton jersey I got at Fabrix in San Francisco (so I can't tell you for sure what the content is, they don't have labels on their bolts).  It's a huge print so I thought breaking it up into smaller parts would be wise.

First let me say, THANK YOU INDIA FLINT!  You have been a huge influence on me in many ways.  Not the least of which is my ongoing practice of eco printing.  I am humbled and inspired by you constantly.

Knowing I could do something with it my pilates instructor gave me a cashmere sweater that had been left in her studio for months.  I've been working with cashmere for about 12 years now, using various methods of construction.  For the past year I've been using every light colored sweater I have, or could lay my hands on, to eco print.  This latest acquisition got me started again.  Back to the dye pots.  Since it was fall many of my tried and true leaves were available again.  Eucalyptus and nectarine leaves are two of my favorites.  But I had many other dried leaves that worked as well.

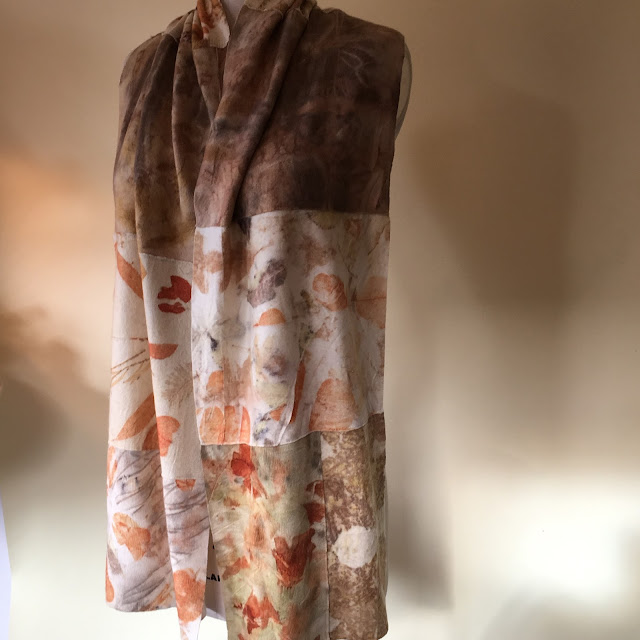
I hadn't been able to figure out what to do with the huge selection of previously printed pieces in my stash.  I had whole sweaters and smaller bits.  I've been taking them out, fondling them, refolding them and putting them back in a pile for about a year now.  I finally concluded that using them in a whole sweater wasn't for me.  So, I cut them all up (it stopped my heart for about a split second) and made scarves out of them.  I think I was feeling like they were too precious to cut into.  Wrong!

Wow do I love them!  I think the piecing is a really good way to show off the individual marks.   

This one is hand sewn using Valdini purl cotton.  It's a very satisfying process to pick each piece and work with it.  Another big plus is that you can still smell the plant materials.  Especially the eucalyptus!  This piece is mostly nectarine leaves.  They start out orange and yellow but dye green, my favorite dye color!

Here's my favorite piece.  It's nectarine leaves again.  They were in various stages of dying, some yellow, some orange some green.

I played around with sizes.  I like varying them but mostly using larger ones, these got a bit too small.

Here you see most three types of eucalyptus, onion skins and dried crocosmia blossoms.  I machine stitched these and like this look a lot.  I used my walking foot which made it a cinch.


I steam most of my pieces.  It gives a more exact print, which I like.  But I love the watercolor effect on this middle piece.  It's submerged in a water bath instead of steamed.  Among other things there are plum leaves, oak leaves and onion skins.

Sorry for this dark shot.  I did most of the dyeing on this one so long ago I can't remember what each piece had on it!

Same here...should be writing these things down but that's just not who I am.

That's all of the eco printing for now.  

Random... but I couldn't resist showing you a piece of sidewalk art.  It wasn't meant to be that but it looked so beautiful to me.

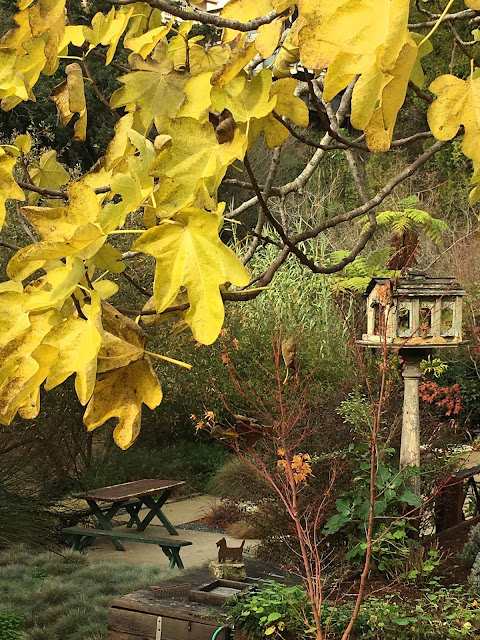
We had quite a nippy fall this year on the Central Coast and the leaves all turned brighter than usual.  Here's a shot of the Spirea looking towards my studio bunkhouse.

And the giant fig turning it's glorious yellow.  It's great for eco-printing, too.  It makes a shocking yellow.

And the stand of Japanese maples turned better than ever!

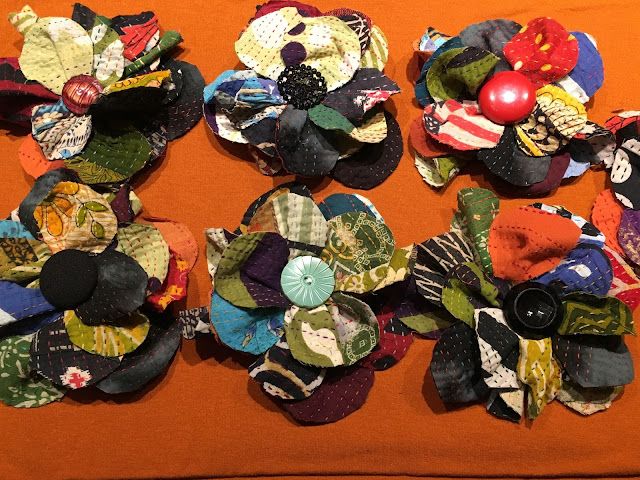
On to the holiday.  My Sewing Guild has a holiday sew-in every year where we exchange gifts.  They are the best gifts cuz these women KNOW what we all like!  I've been wanting to use my kantha scraps and decided to make a flower pin to go on each package.  

I had so much fun making them.  And I used some of my button stash.  I'm determined to use what I have and not buy stuff!!!

Here's how I made them.  I cut three different sized templates for petals, then I cut out 5-7 of each size in the kantha cloth.  I sewed each of the petal sizes together at their bases, end to end, with a basting stitch.  I gathered them so that they formed a circle and layered each petal circle one on top of the other.  Then sewed them all together and sewed the button on.
I glued a pin back to black felt and glued that onto the flower backs. They were pretty darned cute on all the packages.

And finally, I tried to include a video I took of the holiday window at Molly b's on 4th Street in Berkeley. But my post wouldn't send with it attached so just go to their website and check it out!

Have a warm, loving and delicious holiday!
PS...the preview feature is not working on Blogger.com right now so if there are errors here please forgive!

Winter Behavior

$
0
0
 California's Central Coast is getting a the rainy season it truly deserves this year.  I'm loving it.  We live by a creek that does overflow at times but this year the rainfall has behaved itself and given us some respite between downpours.  It's only flowed over the dock once.  Maybe tonight though...

Winter is not my favorite season.  I'm not a skier so there's really nothing in it for me except I love seeing the trees sing with happiness when it's wet.  I try to keep myself busy during the winter months while having no true passion for anything in particular.  It's a good time to finish projects, clean out the studio, take stock of my fabrics and patterns and generally get ready for the time of year I go into full swing.

I've been doing a smattering of things.  My friend Lisa and I were out in the garage on New Years Day over-dyeding previously eco-printed pieces.  With eco printing you win some and you lose some.  But you can always do something with the losers.  Now my losers are all a gorgeous shade of Cabernet.

We used a technique we learned from another sewing pal, Janet.  You mix a slurry of dye, about 2 quarts.  Mordant your cloth...in our case it was old cashmere sweaters...in my case it was ones I'd already mordanted when I eco-printed them.  Then, using a kitty litter tray you pour the slurry over the cloth and "scrunch" it around with your (gloved!) hands.  Wring out any excess dye, place the garment in a lightly sealed plastic bag and steam for about 1 hour or until all of the dye has exhausted (that means you can't wring out any more color).

It makes a really lovely mottled effect that looks interesting when it's cut up and used as pieces.  I made one sweater and one very large scarf/shawl out of my pieces.  I'll get them photographed soon when the sun comes out!

Right now I have a vat of Osage sawdust steeping away in the garage to dye some sweaters and cloth. And I'm dreaming of painting on canvas cuz I went to an art gallery Friday that inspired me....more on that later.

One of my UFO's was a piece of ice dyed stretch cotton.  My attempt at ice dyeing looked like a bad night on Haight Street in the 60's...and I know cuz I was there!  It was truly ugly.  So, I overdyed it with a dark green and this is what happened.  It's now wearable.  The muted over-dye knocked back some of the yellow and got rid of a couple of other colors that were even worse. 

This is a self drafted pattern I've used several times.  Here I hardly had enough for a neckband so I used the fabric single layer and had to piece it in two spots.  It has that deconstructed look which works.  

I'm glad to have this piece of cloth out of my stash and in my closet.  Now, let's see if I wear it!  I'm planning a huge art garage sale with three other artist/sewist friends in the spring and a LOT of my garments are going on sale then.

 This piece is Katherine Tilton's B6381.  It's the first time I've made it but I'll make it again for sure.  I love the fit and shape.  I omitted the pocket in the front and added inseam pockets.

I've had this fabric for about 4 years.  Couldn't figure out what I wanted to do with it.  It's a pretty unique fabric.  I got it from Marcy Tilton.  I think it's a Japanese hand printed piece, I could be wrong but you can really see the printing coming through the back here and there and it looks hand done.  It has a very crisp sort of rough dry hand and it's super stretch in both directions.  Not an easy fabric to find the right pattern for.

I have the fabric going in different directions for the top and bottom.  Not sure it works but I haven't worn it yet so time will tell.

I couldn't find buttons that looked good and I'm not interested in buying more buttons right now (!) so I used this toggle.  Again, I'll see if this works when I wear it.  If not, I'll figure something else out.  It's been so cold it's not vest weather right now.


Joe and I went to the Anderson Collection at Stanford University on Friday.  It's a gem of a museum/gallery.  It's free, huge and focuses on modern and contemporary American art.

Their collection is powerful and very well represented.  Right now there is a Nick Cave show going on that I had to see.  I admit, it's our first time there but we'll go back, we both loved it.

I've wanted to see more of Nick Cave's work and this was my chance.  Mr. Cave makes what he calls Soundsuits. There are 8 pieces and two videos running.   The suits are meant to be worn and the videos show him performing dance movement in them.


Mother of Pearl buttons, wooden sieve with wire.

It reminds me of a sardine somehow.


Mr. Cave uses old textile a lot.  Old crocheted pieces, sweaters, pot holders, socks...
Here he also has beautiful old enameled flowers.

Close up.

Another close up.

Abacus and buttons

The video of the dance movements is mesmerizing.

Sock monkeys (whoohooo I love sock monkeys) and various knitwear


Buttons, sequins and beads.

Close up

Human hair.  I know, this photo looks like it's out of focus, but it's not.  It's just the way the suit is made.  Kinda made me queasy...


Pot holders and crocheted pieces to coordinate.  I noticed that Mr. Cave likes circles and round shapes.

These are two very goofy guys.

This piece was made of various plastics, mostly from the 40's and 50's I think.

Close up of the pot holders.

This is the back of the pot holder suit.  I love this hand stitching!


Pipe cleaners??  The center is one of those plastic bead vases from exactly which era I'm not sure.  I started a collection of them many years ago then had to back away from that idea.  Too bad I didn't know Nick!!

I'm sorry to say I did not take down the name of the artist who painted this.  Bad.  But I love it.  This is the feel I'm trying to get with my painted canvas for purses.

Yum.  I love the layering.  Back to the canvas next weekend!


Well, there you are.  My winter of tying up loose ends.  I'm determined to clean up, clean out and begin the spring with only those materials that are calling to me right now.  Art Garage Sale (otherwise known as You Gotta Have It Garage Sale!) here I come!

Spring~Finally!

$
0
0
I know I'm blessed to live in such a moderate climate but, boy,  has it been a hum dinger of a winter here on the Central Coast.  One storm after another, trees down, flooding, roads caving in you name it.
But, we do have water now which is such a relief.  I think I can actually hear the trees heaving a huge sigh of relief.

My garden is singing happy songs, one plant after another.  These hyacinths are always the first to arrive.

 Followed by the violets.

I haven't been sewing for a few weeks but here's a vest that was drafted from ready-to-wear that I tried in an upholstery fabric I got on a free table.  It actually works for this but I'll be making it again in a grey ponte.

 Here is one of three tshirts I made from Katherine Tilton's V8817.  I used only scraps and felt so great about reducing my stash.  I love this pattern for that reason but also, it's just a darned good pattern.  I always get compliments when I wear one of these tshirts.

The back only has three section, unlike the front which has three.

And here's Marcy Tilton's V9130...again.  I make this often.  It's super flattering and I just feel good in it.  These were scraps...albeit large ones, too.


I attended my 9th year of DOL (Design Outside The Lines) Santa Barbara.  For those of you who don't know what this is I'll explain.  It's a four or five day retreat, given in three different locations each year.  They are put on by Diane Ericson (above), the pattern designer, re-fashion queen, stencil designer, heavy duty teacher of the century.  This woman can do it all.
She teaches at these retreats and now brings in another teacher, sometimes from around the world, sometimes from here in the states.  I've loved every teacher she's ever brought.

This year she brought Christine Mayer from Berlin.  Christine is a clothing designer who specializes in using old textiles.  She brought a line of garments to show and sell that were made from the cloth used to line the old ironing mangles in Germany.
She also loves to work with military rucksacks, jackets, pants and tents.  Her pieces are exquisite and perfectly executed.  I so wanted to buy a piece but they were all too small on me.  So, what could I do, I asked her to help me make a couple of pieces.  She was happy to oblige, that's what she was there to do.  She helped so many of us during the five days and several women went away with new garments that were co-created with Christine.

Here you see a denim jacket that she draped and I sewed.  I had two very large pairs of men's denims which she showed how to cut in the exact way so as to get the most out of the fabric.  Then she began draping the two pants on my dress form.  She used this piece for instructions purposes in one of the morning classes.  We were all staring at her with our mouths open the whole time.
She, like Diane, has an innate feel for fabric and drape.  They just know what to do.  It is always a revelation to watch.
So, she pinned, tucked, created the armholes and sleeves using what she called the Japanese draping technique.  I learned SO MUCH!  I'm panting to get back in the studio and sew.  I did manage to finish a shirt made from three white men's shirts.  It's good but I have lots to learn.  I'll post those pics soon.
If you haven't had the chance to attend a Design Outside The Lines retreat you should seriously consider putting it on your bucket list.  I don't know of a better way for a creative sewist to spend time.

Classes, Retreats and More Retreats

$
0
0
I know it's been a long time since my last post.  It's not because I haven't been sewing cuz I have.  I've sewn in Aptos, Capitola, San Juan Bautista, Santa Barbara and Ashland over the last 4 months.  And there's more to come.  I'm going to a sewing retreat in Oregon and a sewing camp, of sorts, in Tennessee!  And then another retreat and back to Ashland again in October.  Geez...I have what my friend Lisa calls FOMO...or Fear Of Missing Out!  Yeah, I have it bad.

I took another class with Jody Alexander, the book maker, boro queen and all around incredible artist.  This one was on remaking clothes using boro techniques.  I didn't end up using any boro in my piece but did try a Junko Oki embroidery pattern that I've been wanting to learn.  Jody has done a lot of it so the class was a good opportunity to give it a try.


I started with a thrift shop men's grey sweatshirt.  First, I cut off all of the ribbing.  Above you can see the beginning of the Junko Oki embroidery.  I used Pearl Cotton.  Basically, it's the blanket stitch done in a spiral.  Kinda mesmerizing!  


I took this photo to help me remember which direction I was went in!


For the embellishment I took a very small grey tshirt and cut out everything but the neckband, shoulder seams, armhole seams, underarm seams and sleeve cuffs.  Then I hand stitched them onto the sweatshirt.    


It's weird but comfy.  And it does get the looks.  People can't keep their hands off of it.  They have to figure it out.


Then I hand stitched one of the tshirt bodice pieces onto the back and that's where I applied the Junko Oki spider web-y thing.


And THEN, I went up to Ashland, Oregon to attend a Design Outside The Lines with Diane Ericson and Carol Lee Shanks.  I love Ashland more and more each time I go back.  This time my pal, Sharon, and I rented a house which was great fun.

The retreat was wonderful, a great group of gals.  Loved getting to experience Carol Lee's work...and Carol herself, she's a keeper.  And of course being with Diane is always inspiring.  

Above you see a little seersucker shrug; a new Diane pattern that will be out soon I think.  It's super easy and really versatile.  


The back of the shrug.  I sewed it using all raw edges, still not tired of those little guys.


The retreat was about making an outfit for spring.  That is something I've never done before.  I have only made single pieces that I know will go with other things in my wardrobe.  So this was a good exercise for me.  

I tried using only fabrics in my stash.  I almost got there.  The drapy under tunic is a stash piece from way down the pile.  It's a very sheer knit.  The top is a Carol Lee pattern done in a mooched (thank you, Sharon!) grey linen and the pants are a stretch woven from my stash.  I also bought a beautiful mossy green silk top just like this one from Carol to wear instead of the grey one.


I used a fairly new Marcy Tilton pattern for a hoodie.  Marcy blogged about it recently, you should check it out.  There are some great ideas.

This one is made using a beautiful Italian fleece I got at Fabrix in San Francisco. It's thick and soft and yummers!


I'll use this pattern again.  I like the back, I think it would be flattering on many figures.


This is a pattern drafted by a friend.  I've made many of these, they're my morning noodle-around-the-house top.  The fabric is from Marcy Tilton, I got it years ago.


Another Marcy Fabric.  I fell for this one the minute I saw it.  Something I'm trying not to do these days but every once in a while the bug catches me.  This is an exquisite pieced Ikat with colorful vertical stitching that holds down little cotton dots.  All the work that went into this piece of fabric is mind boggling.  I'm just gaga over it.

I made the Lynn Mizono shirt again.  It's a pattern I go back to often.  Certain fabrics just call out for these lines.


It's hot off the machine, think I'll wear it tomorrow!!


I finally got up to UCSC's Sesnon Gallery for the Crochet Coral Reef show.  I'm glad I did.


If your in the Santa Cruz area check out Seymour Marine Discovery Center.  They are showing several pieces that community members have made, very cool!

That's all for now, I'll check in around the beginning of June.  Hopefully I'll have something fun to show you...it's a sewing project completely new to me that has some quilting in it...yeah, I know.  I'm not a quilter.  I couldn't sew two lines of fabric together evenly if my life depended on it!  But hey..I'm game!


Wedding Outfit

$
0
0
I haven't been to a wedding in years.  I guess I just don't have enough young people in my life. My goddaughter Laurel is getting married in a couple of weeks and I wanted something new for the occasion.

It's an outdoor wedding here on the Central Coast of California so it could be warm, it could be foggy or it could be just downright cold.  Here's what I came up with.

I bought some gorgeous linen from Carol Lee Shanks at DOL Ashland a month ago.  This Style Arc Jema Panel Dress seemed like a pattern that would be easy to wear but has some cool lines that make it a bit more interesting.  Of course you can't see them here...bad photo...but the lines remind me of a Mondrian painting.  It's really a long tunic so I'll wear grey capri length leggings.
Simple and understated, fade into the background garment so I don't look like I'm trying to compete with the bride...not that I could at 68!

But then, it was a little too understated...so I found this gorgeous cotton lace I bought from Marcy Tilton about 87 billion years ago.  It's been fermenting.  I take it out every now and then and dream.  I thought a kimono shaped duster over the grey linen might dress it up just enough.

And now I'm on the hunt for the perfect necklace.

These might do.


I'm just back from a dreamy four days in Tumalo, Oregon with a pack of wonderful quilters.  I'm not a quilter but was inspired by Heidi Emmett's Off The Grid Vest pattern.  I met Heidi at a recent retreat (yes, I'm a retreat addict) and loved her.
I decided to try the vest using my kimono scraps.  I worked on it in Tumalo and have it ready to bind the edges.  Here are the first few pieces up on the design board.

Some of the cuts for the long rectangle pieces that float here and there on the vest.

This is what it takes for me to be a quilter.  Two fingers of Bullet Rye Whiskey.

Heaven.  Thank you Eloise and Victoria for making this happen!

Off The Grid Vest

$
0
0
As I mentioned in my last post, I've been working on Heidi Emmett's Off The Grid Vest.  In the beginning I was nervous because I'm not a quilter.  After the first hour or so I just went with my gut and forged ahead.

My sewing style isn't one that lends itself to perfection.  I'm incapable of sewing straight, I love raw edges and I don't care when everything isn't quite perfect. 

It's the overall look I go for.  The feel of a garment.  And to be honest, I change my style so often that I wear a piece of clothing for 1-5 years, tire of it and sell it at a garage sale.  It makes no difference if I've spent days or hours on it, when I'm done-I'm done.  My style changes yearly and so do my clothes.


All that said, I loved working on this vest.  It has so many things going for it.  Simple lines mean you can focus on the fabrics which I love.  I used Moda Grunge cotton for the base fabric.  It's black with washes of pinky grey.  

I've had a huge stash of vintage kimono scraps since our trip to Japan about 10 years ago.  Although I've been using them in projects for years I still have lots.   So I decided this was a good project for that.  The pattern calls for quilting cottons and the main fibers in my kimono collection are silk and rayon...much less stable.

Although Heidi recommends using Terial Magic, a kind of starch that quilters use, it still didn't provide all of the sturdiness I needed for this project.  But I forged ahead with a somewhat wonky result.  But I like it anyway!

I think this style qualifies as a tabard, right?  The sides are held together with just one button.  One of the reasons I wanted to make this vest is that I tried it on at a retreat in April and it's VERY flattering. In fact, it was flattering on every single woman who tried it on.

I had a devil of a time figuring out what binding to use.  I wanted something that would remind me of a light summer suit that I would see on a businessman in Tokyo.  A tiny grey on darker grey pattern that read solid from far away.  Understated but elegant.  Couldn't find it.  Finally I went with a purple quilting cotton that has a tiny pattern.  But I wasn't happy so I picked up another couple of fat quarters at The Stitching Post in Sisters, Oregon.  One of them I incorporated into the blocks but I didn't think either would work on the bias trim.

Luckily, I also picked up a bottle of Jacquard Pewter Dye-Na-Flow.  It's kind of like India Ink for clothing.  I thought if I knocked back the purple it might blend in so I painted that on the bias strips.  It came out very uneven but when I folded them in half and laid them under the garment edges to audition the color it worked. 

I found two 30's deco buttons in my stash that felt right...finally had buttons that actually worked on a garment.  Somehow, with hundreds of buttons in my collection none seem to be right!

This vest is a very dramatic look.  I can't wait to wear it.  Joe says I look like a warrior!


What I Did With My Summer Vacation

$
0
0

In late June I was lucky enough to attend Dorothy Caldwell's Mark Making class at Shakerag Workshops in Sewanee, Tennessee.  I met three of my sewing buddies, Sharon, Sarah and Holly for a time of pure bliss.
Shakerag is a summer arts program at a private high school on the campus of the University of the South.  Attendees live in the dorms, eat in the dining hall and take classes all day for an entire week.  
Just being in Tennessee was magical.  The folks there are friendly...with a capital "F".  So warm and welcoming.  The campus is gorgeous, the meals were insanely wonderful.  In fact, I am bringing their two head chefs to my bakery/restaurant in July of next year to cook for our customers, they will love their southern food.  Every meal was better than the last.  Hush puppies, stewed greens, lots of vegetables right from local gardens, meats from local pastures, we couldn't have asked for better food.
And Dorothy's class was a meaningful experience.  Her term Mark Making refers to the shapes we make with our hands, whether using a brush, a pen/pencil or a needle and thread.


Dorothy explaining one of the many techniques we used to create pages for books we assembled later in the week. 

One of our assignments hanging to dry.  Each of our assignments, after completed, was hung together with the other classmate's and together they were very powerful.  This one used our fingertips.

This assignment used brushes on bamboo poles with the paper on the ground.  Using our whole bodies we made shapes with India Ink.  So fun and surprising.

Our brush-poles and tootsies.

We burned holes in paper with incense and smudged paper with soot from candles.

The inimitable Claire Reisham, the founder of Shakerag Workshops giving us instructions for the day to come.  She is one powerful woman.  Her energy and spirit sets the tone for the week.

The gorgeous dining hall.  A pleasure to dine in.

Our first finished assignment,  little bound books made from scraps of paper.

After our week (and believe me we didn't want to leave! Were all signed up for next year already!) the four of us piled in the car and headed to Alabama for a day in Florence to visit the Alabama Chanin Factory.  On the way we needed to find somewhere to have breakfast.  We were traveling the Nachez Trace.  Holly found us a true southern breakfast in a little town along the way.  
It was Father's Day Sunday.  It was a traditional southern cafeteria-style buffet with every imaginable thing on the groaning table.  So good!!

And finally we got to the Factory.  First ,we sat down for another meal.  It's lucky for me I travel with women who like to eat as much as I do.   Everything was delicious, but the biscuits that Natalie Chanin's son created were out of this world.  We asked her if we could come back for one of her sewing classes and learn how to make the biscuits, too.  She said yes!
Above is a shirt that I fell in love with.  We really enjoyed our day there.  Bought lots of fabric and had patterns made for us that would be shipped.  I've got three scarves in the works.

I wasn't home for a week when Joe and I took off for three weeks in Montreal and Nova Scotia.  While in Montreal we caught the Gaultier wedding dress retrospective, 'Love Is Love", at the Montreal Museum of Fine Arts. Much like the show I saw twice in San Francisco, it had talking mannequins.  Loved the whole experience.

One thing I didn't find in Montreal was a clothing shop.  No inspiring clothing anywhere...maybe I just missed it.  Can't imagine they don't have style there.  But I did see this cool vintage sewing machine that had been sprayed silver.  It was in the window of a clothing designer upstairs.

We fell in love with Nova Scotia.  We put 2,100 miles on the Jeep.  NS is worth visiting.  The people are super friendly, the shellfish is everywhere and utterly fresh and delicious.  The landscape is fascinating with little fishing villages tucked into deep coves everywhere.  We really had fun. 
Here you see the cottage of the famous Nova Scotia artist, Maude Lewis.  The whole cottage has been transported to the Art Gallery of Nova Scotia museum in Halifax.
I'd visited once before and wanted to show Joe.  Little did I know that Maude has had a comeback and is very popular right now.  There's a wonderful movie out right now called Maudie.  If you haven't seen it I recommend you do.  She was extraordinary, very inspiring.
We also visited two other replicas of her home in various parts of NS.  And the museum has a large show right now with dozens of her works loaned by a collector.

Ok, enough of where I've been.  I've not been sewing much, as you can imagine, but did manage to make this shirt.  Designed by Katherine Tilton, B6459 is a fun shirt to make.  Here I used three scrap fabrics to see how the pattern fit.  I really didn't expect I'd like the mix of fabrics but I do.  The body is fabric leftover from another garment I made, the light blue is some quilting cotton I got at the Expo in Puyallup cuz I loved the octopi, and the sleeves/collar are Indian hand blocked cotton I got at MAIWA while there for a class.

This pattern has lots of details that are fun to put together and looks really good on.  I recommend this pattern!!

That's all folks, more when I can get back to the workroom.  Enjoy the halcyon days of late summer.  I sure am!

Cabrillo Gallery Exhibit

$
0
0

I want to tell everyone that is within earshot and who has a love for textile art to high-tail it Cabrillo College for the current show at the Cabrillo Gallery.  Cabrillo College is located on the Central Coast of California in Aptos, a hop, skip and a jump from my Capitola home.  I'm so lucky to have this college near me for a lot of reason.

One is this gallery, another is the many fiber/textile classes they offer in their Extension Classes.  Be sure to check those out, too.

This show is curated by Beverly Rayner, it's a knock out!  There are so many jaw dropping pieces I can't pick just one or two.  I don't know how she did it but she found so many fiber artists of superior quality.

The show is super fun, try not to miss it!


New Threads: Unraveling traditions in fiber
Opening this Saturday, September 30, 5:00–6:30 pm

October 2–October 27, 2017 
Please join us for the opening reception of New Threads: Unraveling traditions in fiber. Admission is free and the gallery is accessible to all. Parking is available on the street and in paid lots during the week and is free on weekends.
The possibilities in the use of fiber as an art medium have exploded in recent years. More and more artists are harnessing the materials and craft of textiles that have been handed down through countless generations to explore new forms and communicate utterly contemporary issues and ideas.
The artists in this exhibition reinterpret conventional approaches to the use of fiber in surprising, inventive, expansive, or subversive ways. Imagine a short film made from woven images; shredded currency stitched together into a brocade pattern; a grouping of bees, each in a tiny custom crocheted wrap; a sculpture that is half horse hair, half shadow; a drawing rendered in wool on paper; cowboys constructed from lace; or embroidery mapping the drift of toxic radiation from a nuclear reactor meltdown. Things aren't like they used to be!

Classes and Retreats

$
0
0
Yes, I can't get enough of them.  For me, sewing with my friends is the best relaxation I can find.  AND, I get something done.  All good.

I've had a wonderful fall.  First I attended a two day marbling class at Center for the Book in San Francisco.  It was given by a professional and very talented instructor by the name of Pietro Accardi.

The first day we learned to marble on paper.  The second day, and this is what I came for folks, we learned to marble on cloth.  Yikes what a fun class.  I'm kinda hooked although I can't see myself making and wearing a lot of garments from marbled fabric.  But I love the color and design so much.

 Here's the start of a piece.  Paint is squeezed onto a gelatinous surface in multiple circles.

Then it is manipulated several times to make one of the multitude of designs.

This is one of the more traditional designs, ready for the cloth to be placed on top.

And then there are my designs.  If you try to teach me anything you'll be sorry because I never want to do exactly what is being taught.  It's hard wired into my psyche I guess.  

I love these big voluptuous designs.

One of the great things about this class is that you are able to produce so many pieces!  There's color and pattern everywhere...it's intoxicating.

I recommend this class to anyone, so fun and achievable.  I've done a bit at home, too (see results below).  I made bias tape out of one fabric piece and like it very much.  It's going to be good for gifts and to wrap around flowers I give from the garden.

Several weeks later I attended an annual sewing retreat in San Juan Bautista.  Great fun with 20 of my sewing pals.  I look forward to it every year.

I made this sweatshirt from a thrift store white cotton men's sweatshirt that I marbled.  It actually worked!  I had to cut it up first to fit it into the marbling tray, then sew it back together to fit me.

 Then it was on to Ashland to Design Outside The Lines with the amazing Diane Ericson. I'm always astounded by her abilities to create new shapes.  She's a combination of engineer and artist...a good combo indeed!

 Halloween hit while we were there.  Geez, I thought Santa Cruz went all out for Halloween but Ashland puts us to shame.  The parade lasted about an hour!  Here are three lovelies having a whooping good time.


Several of us got our hair cut by the talented Crystal.  Here's Sham's getting shorn...so cute!

And here she is showing everyone her new do.

And then it was back to work!

Kathryn Brenne was the other teacher for the week.  Such a wonderful teacher and so talented.  Her garments are all couture quality and she's fascinating to watch and learn from.

DOL is so worth attending.  If you've been thinking about it you shouldn't wait, just do it!  And If you've never heard of it check it out!

And last but not least, I just got home from a day of sewing with my local pals.  We had a class from local artist, Diane Ritch.  A very talented woman who works in all kinds of different art forms.  

Today she was showing us how she makes her darling little needle cases.  She brought the inside parts, including a bevy of needles, to tuck in when we finished.  Here are mine sitting atop my new little darling...a pale green Singer Featherweight I got at a yard sale.  

This was her maiden (for me) voyage and she did very well.  This is going to be my travel machine from now on for simple projects.

Here's part of the crew setting up.  Diane is second from the right.

Here are the fabrics I brought to work with.

And here are our finished cases...minus Anne's who had to leave early.  Mine are the two at the bottom left and center.  The red one is home dec fabric I stenciled years ago.

The inside "leaves" are made of beautiful thick felt or felted sweaters.

Good times!


Inspiring Holiday

$
0
0
I just returned from a winter holiday in Paris and Florence.  I always forget how inspiring these cities are...in every way.  I come home with tons of ideas for new things to make at the bakery/rosticceria, ways to redecorate the house and garden, and best of all, new clothes!


There's still nowhere like Paris.  It didn't disappoint.  Our first trip was to study baking back in 1980--gads, that seems like ancient times.  We traveled to France thereafter every year for about 20 years.  It's been so long since Joe and I were in Paris together.  We had a blast.  We rented a lovely apartment, Grand Marnier, from a company called Paris Perfect.  I highly recommend this company.  They are professional, friendly, helpful and have the most beautiful places to stay!

We walked until our feet screamed, drank wine for lunch AND dinner (something we NEVER do at home), bought a museum pass so visited more museums than usual, and ate everything we could lay our hands on.

I, of course, shopped as much as I could squeeze in, considering I was traveling with a man.  But it was enough.  I managed all three Noriem stores where I found two tops (see below) and Manuelle Guibal, where I found a Sophie Digard scarf I couldn't say no to (also see below).  And I found a great new pair of glasses at my favorite eyewear shop, Les Opticiens du Bac.  


On to Florence where we met friends for a two week stay in an ancient palazzo.  Gorgeous but chilly!  We managed though and had a great time with them.  They love food as much as we do and they both like to shop!  Bonus!!

We pretty much did the same things in Florence we'd done in Paris, just a few less museums.  Joe hit every studio he could find; Dante, Michelangelo and others I can't remember because I was off shopping with our friends!

Breaking News!!!--I found a new Noriem store in Florence.  I just stumbled on it.  It's not on their website nor is it on the map.  It's so beautiful, possibly the most beautiful one I've visited.  Of course I found a vest (see below).  

I'm not sure if I was lucky or unlucky that it was winter and most of the clothes were wool.  I'm allergic to wool, sort of.  I can wear it if I have lots of protective garb underneath but California weather is never that cold so I just don't buy it.  Hence, I only found a few things to buy...good or bad, you decide.  But, oh, those wool garments were gorgeous.

I did a couple of things on this trip I've never done before.  I decided that since I was going in winter my clothes would not be so important since they would be covered up most of the time with a coat.  So, 1. I bought myself a great coat, and 2. I only brought 4 remade cashmere sweaters (see below) and two pair of pants to wear.  I brought 7 scarves though, and they helped make me feel I was changing outfits.  This plan worked out well.  I didn't focus on clothes so much and I think it was good.  
The coat I chose is huge.  And I use that term only because I can't think of a better word to describe how big it is.  It's a Rundholz I bought at Mio in San Francisco.  It has two HUGE pockets that I used as a purse.  I hate wearing purses in cities and winter clothes don't lend themselves to fanny packs.   It worked so well!  I only had my phone with my credit cards in a little attached case and a small cloth bag with lipstick and other essentials.  But I had room for an umbrella, hat and gloves when I needed them.  I looked like a squirrel who was packing it away for winter but what the h___.  I'm going to use this method again. 

I did need to modify the pockets before I left and I'm so glad I did.  I sewed in two smaller polartec pockets inside the huge ones so my hands would have somewhere to rest and stay warm.  I couldn't even reach the bottoms of the big pockets without pulling up the coat from the bottom!


So now on to what I made to wear.  I apologize for the ratty photos, the winter light in the bunkhouse isn't so great for photography.  This is a black cashmere I made from three previously worn sweaters. Simple design, different weaves for accent, asymmetrical hem.


A slightly better photo of the back.  Hand stitched patch on upper back


This one of multiple grey, previously worn cashmeres.  Slim line with fun peplums at either side.


The collar was hand stitched on with an exposed seam at the shoulder.


This one was fun to make and wear and super comfy.  Several grey, previously worn cashmeres with mostly exposed seams.  It's hard to tell but both sides are different.  One has an open flounce (shown below) and the other side has a little design shaping.


This is the side with the open flounce.


A pretty straightforward design using many scraps from previously used red cashmeres.  


A bit of an assymetrical hem.


Apologies to Sophie Degard, the color of this scarf is SO much better in person.


One of the Noriem tunics.


Another Noriem tunic.  Love this one.


And the Noriem vest purchased at the new store in Florence.

So there you are.  I'll post a few more times on different aspects of the trip as I get back into my life.  But for now, my fondest wishes for a healthy and fulfilling 2018 to all.

Winter Play--Again

$
0
0
Goof up alert!!!...I don't know what happened but this post went out all on it's own last night!  I wrote part of it before dinner, woke up this morning to a comment and realized it must have posted.  So sorry.  For those who have read it, just scroll down to the photo of Diane and Helen and continue.  For those who have not, I hope you enjoy the whole post!

Here goes....

I'd call this post refrigerator round up if I was in the kitchen.  There are so many things I'm piling into this post it's like the fried rice Joe is making us for dinner...some of everything we've eaten in the last few days!

I'll start with a lovely quilting retreat I went to on the coast of Oregon.  I'm lucky to be included in this incredible group of women.  A long time friend, Victoria, invited me to join them a few years back and I never say no to Victoria.  Loved the whole trip.  First to Eugene, on her horse ranch/farm (I'm a city girl, I don't know what to call it!).

I traveled with another lovely lady, Gracie, and the three of us moved on to Seal Rock to join the others for a few days of sewing.  I'm not a quilter but my god daughter is having her first baby and I wanted to make her a baby blanket.

Well, I didn't know what I was doing so thank goodness for Victoria and another friend, Kathy, who gave me so much help.  Basically, I made mistakes and they fixed them!  (See below).


I know that my god daughter likes neutral tones, no pinks and blues for her.  I chose grey and I'm glad I didn't, when she opened the present she exclaimed, "My whole house is grey and so is the baby's room!" Whew.

Here is the baby blanket put together but not finished...oops, it turned out a bit large...but they can use it for watching tv!

I actually like modern quilts.  I might just make others...someday.  Thank you to everyone at the retreat who helped me make this.  Lord knows I needed it.


Oh, and while I was up there I bought a new Baby Lock Triumph serger!  I have an Evolve that I've loved and wanted one with a large space for piecing cashmere.  I bought it from Paramount Sewing and Vacuum.  Very nice people.  Love this thing.  I've been using it all weekend and it's a dream.


This vest is made from a ready to wear piece that a friend bought.  Jenny made a pattern and I gave it a try with fabric Sharon gave me.  It's a heavy stretch woven novelty that I couldn't figure out how to use.  This seems to be a good result.  I wore it in Ashland recently and it feels good.  I'll make more of these for sure.


The pockets are tucked into the side seam.  Hidden but useful.


Kinda like a sidesaddle kangaroo!


During January I went through an insane period of working with down-filled objects.  First I worked with two men's extra large puffer jackets I bought in Ashland.  They were on sale for a pittance and I couldn't resist.  
I've been asking Marcy Tilton to find puffer jacket fabric for years now and I know why there is none available.  It's completely bonkers to work with.  I had to take the jackets apart, place my pattern pieces on the fabric, trace around each piece, sew on either side of my tracing, cut in the middle of the stitching and STILL had feathers in my nose.


I ended up using all four of the pockets from both jackets so there's no shortage of pockets here.


I used the stretch binding I ripped out of the original jackets to bind the hem.  Oh, I forgot to say, all of the seams were BOUNDS so I had to tear out the binding first.  I did use it all to bind the new seams.


A little tail never hurt anybody....


And then, as if that wasn't aversion therapy enough, I decided to cut our duvet in half and make two comforters so Joe doesn't tear the covers off me every night (it's worked, by the way).  I'm sleeping better and so is he!

I just got home from DOL in Ashland.  I enjoyed myself thoroughly.  Diane Ericson was spot on, as usual.  So inspiring and invigorating.  She invited Helen Carter from Secret Lentil to co-teach. What a hoot she is.  Her approach to designing clothing is totally intuitive and very fun.  I've loved her clothing for years, own two pieces, and wanted to see how she works.


I needed to draft a tunic top for woven fabric so I used an existing vest pattern.  Forgot my pattern weights so the tangerines that Honna brought worked perfectly.


I began auditioning the fabrics I brought.


I was really inspired by Tracy's version of Helen's spiral concept.  A big part of DOL is the incredible women you meet.


And here is my version.  I made a little Diane Ericson French-Fold Shrug to go over the top.  It's a very cool pattern!


And another version in a tissue weight knit that Judy, another participant, graciously gave me at the retreat.
I made another spiral shape for the turtleneck.


And finally, I finished a ripstop lined in polartec raincoat I've been working on since the last DOL!  This fabric was a nightmare to work with.  I'm finished but I don't love the detailing results.  I'll never work on this type of fabric again.
I guess my winter of 2018 was all about what NOT to sew with!


Stay tuned for another whacky project I started yesterday.  It entailed a LOT of ripping out as yo can see below.

Happy almost spring everyone!


Cashmere Scraps Faultlines Vest

$
0
0
I've been working with Diane Ericson's Faultlines vest for the last couple of years.  I like it because you can make so many design decisions along the way and fit it after it's made by overlapping the back and side pieces.

This one is made using scraps of cashmere from old sweaters that I overdyed using a method that creates very uneven results...which I love!  It works so well when you use several different color sweaters because they dye in various shades of the same color.  Then, when you cut them into small pieces, they make a wonderful landscape, kind of like the ones we see from an airplane window.

These sweaters were dyed using Dharma Trading Company's Cabernet Acid Dye.  The inspiration for the design came from the gloriously talented and fun, Gwen Spencer.  Gwen has become a good friend over the years.  I first met her through Marcy Tilton.  If you click on the link you will see one of the tutorials on Marcy's blog that features Gwen.  They work closely on Marcy's designs for Vogue Patterns. 

She is amazingly talented and a stellar teacher.  Anyway....I attended a sewing retreat with her a couple of years ago where she was hand sewing cashmere squares onto a lovely wool piece that was turned into a shawl.

We were all gobsmacked with, 1. the fact that she didn't even BRING a sewing machine but sat with her hand sewing all week, and 2. the absolute simplicity and beauty of what she was making.


I came home and immediately started thinking about how I could incorporate her idea into something using my abundant cashmere scrap collection. 

This vest took me two years to finish.  It wasn't one of those lap projects where you can work on it in the car or waiting at the dentist!  Because the base fabric is a stretchy net the piece needed to be on a flat surface so that the squares stayed put while sewing.

I cursed this project more than once.  My love-hate relationship with hand sewing is kind of a joke.  I want to like it since so many of my friends who sew extol it's virtues.  But mostly it hasn't been all that satisfying for me.  And believe me, I've given it every chance.  In fact, I still do.  Right now I'm working on an Alabama Chanin piece I got while in Alabama last year...after a hand sewing workshop!! And I'm going back to Tennessee this year to take another hand sewing class from Christine Mauersberger.  I swear, if she can't teach me to love hand stitching no one can!

In the meantime, I'm happily machine sewing and on my way to San Juan Bautista for a sewing retreat where I'm bringing FOUR machines!...well, only two are for me, I'm bringing two for women who are flying in from Colorado.

Hope your sewing, whether it's hand or machine, is super satisfying!


Spring Roundup

$
0
0

I've been busy sewing this spring.  I've been trying new things as a result of taking a community college sewing workshop with the delightful Kiki Berrett, a very talented clothing designer and nurturing teacher.  
I'm trying to learn some things I've never slowed down enough to learn.  Like welt pockets and just being able to answer questions that arise while I'm sewing.  I've learned a lot.


Here's a shorter tunic than I'm used to making.  It's Katherine Tilton's Butterick 6564.  I love it!  This was one of the most fun, challenging things I've sewn in a while.  One of the good things about it is you can use smaller pieces of fabric from your stash, which I've done here.  I like to make a "muslin" when I first try a pattern, just in case.
The muslin is wearable for sure, and I used stash fabrics!
I found the pattern to be quite large so I used a sloper I have for upper body knit garments and recut the top.  But kept the details the same.  And there are a LOT of details in this pattern.  One that I particularly love is the asymmetrical neckline.

This pocket is really good looking and fun to make.

The contrast fabric, which can be in either woven or knit, wraps around the left side from front to back.  

And the asymmetry is very attractive and a fun element to work with.  There's plenty of room for tweaking in this pattern.  For instance, I didn't insert a little flap that goes into the back left seam.  
I'd say she knocked this one out of the park.  Try it and see what you think!

Here's another Katherine Tilton pattern I've used several times both for vests and jackets, long and short.  It's B5891, the jacket version without sleeves.
The fabric is a lightweight cotton blend that has a natural wrinkled look and a somewhat shiny surface.  I'll be throwing this on over lots of tops this spring and summer.

Those of you who read this blog know that I go to a lot of classes and retreats.  I find myself having to use several totes to get everything in.  You know, lights, extension cords, power strips, pressing hams, you know!
So, I decided to make one very large bag that holds everything.  The cloth is made by Miles Frode, the extremely talented son of Diane Ericson.  I can't resist buying his fabrics.  And I like to use them in a way that show off the whole piece of cloth...like a painting.

I made my first zipper pocket, based on the knowledge from my Kiki workshop.  And yes, I intentionally made it off center, it just looked to normal right below the handles.
I'll get a lot of use from this bag, and a lot of pleasure every time I see Miles' zany designs.

Some of the interior fabrics are mine leftover from the purses I make.


I went to Pajaro Valley Arts opening of their Museum of Curious Perceptions exhibit.  This little museum is in Watsonville, CA, not far from my home in Capitola.  I support them and love their exhibits.
This one has many of my friends in it; women who's art I love and collect.  Here you will see a few favorites from the show.
There's an explanation after each image.


I encourage you to go and see this exhibit.  There's plenty more I didn't get the chance to photograph. It's a fantastic show.

Happy wisteria season!


A Tetrad of Tilton's

$
0
0
I'm not even sure tetrad is the correct term to use here but I was looking in Thesaurus for a word beginning with "t" that meant four.  This is what I came up with so there it is.

Anyway...I'm back on the Tilton sister's train with four new garments, all from TNT patterns I love to make and wear.


I've made Marcy's V9230 three times now, as a coat and a vest.  It is generously sized so it fits comfortably over other clothing.  
This version is made using what I think is home-dec fabric given to me by my dear friend, Lynn.  Thank you Lynn, I loved working with this fabric.  It doesn't show in the pics but it is several shades of earthy green.


You should give this pattern a whirl, it is not a quick sew but really satisfying.  It has something like 21 pattern pieces, most single cut, so it's not for everyone.  But it falls right in line with my new slow sewing practice.  And when it's done there is such a sense of accomplishment.

Here is a wad of luscious, velvety purple corduroy-like fabric that was given to me by another great friend, Patty.  She cut it out for a long dress but decided against making it.  I found it on the free table at a retreat this spring and swooped it up.


I wanted to try inserting sleeves in Marcy's V9112.  The sleeves I cut work well.  This is just a muslin since I think this fabric is a bit heavy for the pattern.  But it will be a great knock-around dress.  The fabric is very soft and comfy.
For the next go-round (in thin black linen, I think) I want a tunic length.   I'll try making all of the pieces shorter by cutting along the bottom of all the pieces at a smaller pattern size line.  Hoping that will work.

I had so little fabric I didn't even have enough for the neck facing so I used a scrap of Kaffe Fassett cotton.

The last time I went to the Sewing Expo in Puyallup I met Marcia Derse.  She designs primarily quilting fabrics but the quality of the fabrics she uses and her designs are also great for garments.  This fabric is called Treasure Hunt.  Once again I didn't have a lot of fabric so I had to cut creatively. 

 I used another TNT pattern, Marcy's V9171.  This is a not-to-be-missed pattern.  It looks good on every single person who tries it on.  And it's very fun to make.  I like to wear it with a Diane Ericson Fault Lines vest.

This is the first time I've made Katherine Tilton B6491.  The fabric is a slightly stretchy black denim I got from Marcy.  It turned out to be a bit too heavy for this pattern to be considered a shirt.  But I'll wear it as a coat dress in cooler weather.  I'd make this again in a minute using a lighter weight fabric.

I faced the pockets with collaged fabrics I made in a Holly Badgley class.  I'm loving the deep dive into my stash these days, it feels really good to use what I have.

And here's the other pocket.

I bought some killer rubber snaps at Passamaneria Toscana while in Florence.  Wish I'd bought many more.  Do any of you know where I can find them online?
I've seen this snap closure treatment on several RTW garments.  This technique is NOT an easy thing to do well.  Mine are passable, not perfect.

And that's it for the Tilton Tetrad.  I have the whole weekend off and I'm headed to the bunkhouse to sew!

Summer Sewing

$
0
0
I feel summer around the bend.  Day's are heating up and I have some stash fabrics I'd like to use.

I got this quilting cotton in Nova Scotia at a fabric store that was going out of business.  It was something like a dollar a yard and I had just decided I need to wear more color.   So I took the rest of the bolt.
I've made Marcy Tilton's V9174 before and enjoy wearing it but I wanted to add pockets.  I've been taking a once-a-week sewing workshop with Kiki Barrett, a local fashion design, sewist who is, in my opinion, on the highest branch of the tallest tree.  She's talented, patient, easygoing and innovative.  Her 5 hour workshops on Fridays are not to be missed.  Check out Cabrillo College Extension for the next session if you are anywhere near the Santa Cruz, CA area.

Anyway...Kiki helped me figure out how to add pockets to this design.  She suggested adding a second layer to the bottom-most pieces.  It worked great.  It did add some heft to the garment so it's more of a spring/fall piece than summer but I'm happy with it.

Here's a detail of one pocket.  The other side is slightly different since they both fit into existing asymmetrical seams.

I'm a huge fan of Martin Margiela of Maison Margiela.  I was in Barney's SF last fall and spotted a leather purse he calls the Origami Bag.  I fell hard.  But, I don't wear leather purses often.  I thought about it, went online and dreamed about it...but that kind of purse is not suitable for my lifestyle, it's just too classy.  But the lines were fascinating.  It's basically a square that is folded origami style.

I decided to try it using an old pair of denim pants, zippers, handles, hardware and scrap leather I had in my stash.  I had so much fun making this.  I don't think I'll make another, I think I got it out of my system.  But it was a fun exercise to look at a design and then try to copy it.  My hat is off to Mr. Margiela and his designers, they are geniuses! 

The handle can be attached in the place you see it above, or can be attached at either side where you see one of two loops.

Or you can attach it to the bottom.  Ingenious. 

Take care and have a wonderful late spring. 


A Sewing Vacation~A Class and Some Clean up

$
0
0
Sometimes I like nothing better than to straighten things up.  Clean out a drawer or two, organize a stack of fabrics, it's probably just a chance to visit with my favorite things.

One such opportunity came after a recent trip to Oregon for a sewing retreat with a group of terrific women.  Each year, on the way to the retreat we stop at an annual garage sale.  The woman who holds it collects the best stuff all year and we are the happy viewers of vintage furniture, kitchen wares and often there are sewing related things. 
This year there were several vintage black singers with the intricate gold and colored paintings on them.  They were never going to be used again but would make great lamps or garden art.  Alas, I was flying home so couldn't get one...they were only $15!!!  Sigh....
I did find a baggie of old wooden thread spools though.  It had two aqua/turquoise colored ones in it, and I save that color in a big glass jar.  So I felt justified getting the whole bag for $5.
When I went to incorporate the rest of them into ones I already had (left from my grandmother, mother and me) I found my collection beginning to really take shape.  Now, I'm wondering what to do with them.  Any suggestions?  

One of my sewing pals, Janet, taught me how to make these clothesline bowls.  They are addictive!  If you want to make them (many of you have already, I'm sure, they have been super popular) there are plenty of tutorials online.  Be sure to get 100% cotton clothesline.
I made one for each of the 8 women at the retreat...and then I made some more.  Way addictive!  Another way to use scrap fabric.  I wish it used more of it.  The original technique, I think, is to cover all of the clothesline with the fabric, which would use lots more fabric.  But I prefer the off white with just a little textile peaking here and there.

We are so luck to stay in the beautiful home of Eloise W.  Way out in the horse country of Tumalo, between Bend and Sisters.  Yes, of course we had to stop in Sisters to visit The Stitching Post.  It's mostly quilt cottons but the selection is mesmerizing and of the best quality.  Plus they are stocking more garment fabrics so I picked up a wonderful woven cotton for billowy summer pants.

We always seem to arrive just when the irises and lilacs are blooming.

I took a class with Kayla Kennington last weekend.  She is one talented woman.  She had lots to teach.  I chose her new technique "Everyday Boro".  I wanted to use a pattern that was drafted from a RTW garment that I've used before.  It has several small pieces that lent themselves to piecing.
Of course I used only scraps. And for some reason, after finishing the garment, I still have the same amount of scraps...what the...???  Does that happen to you, too?


I really enjoyed Kayla's teaching skills.  Just the right amount of attention and not too much instructions leaving more time to just figure it out.


Most of the fabrics are knits with the exception of this cotton kantha-like textile that used to be a vest I got in Como, Italy many years ago.  It never fit right so I finally cut it up.  I love the fabric and have been using it for all kinds of projects.

On of Kayla's interesting details is a seam that is closed by using bar tacks.  I wanted to try that so here you see it with the little red tacks down the side seams.

A close up of the bar tacked side seam.  I used a lightweight dupioni silk for the binding.

And here is one of Kayla's pieces using another technique she taught us.  This one is tacked with a decorative stitch.  Her techniques are so eye-catching.  Not easy but certainly learnable.  I recommend taking a class from her if you can!!  Thanks Kayla!
I'm off to Tennessee with a handful of sewing pals to attend Shakerag again.  Last year was so fun we all signed up again...and a couple more added.
We are taking a class from Christine Mauersberger titled "Intuitive Stitch".  Hand stitching...here I go again trying to find a way to love hand stitching.  Will I ever get it?
There will also be lots of southern food involved, the chefs at Shakerag are THE BEST!!  So good, in fact, that I am bringing them back to Capitola in July for a Southern Nights stay where they will cook at Gayle's Bakery & Rosticceria!

Enjoy your summer and thanks for stopping by, y'all come back now ya hear?


Viewing all 115 articles
Browse latest View live