Quantcast
Channel: Gayle Ortiz
Viewing all 115 articles
Browse latest View live

Stenciled canvas vest and remade men's shirt combo

$
0
0
This post is about two garments.  I'm combining them because I wear them together and think they both look better as an outfit.  This makes for a long post which I promised not to do when I started this.  Hmm.. I'll have to work on that.  I'll talk about the shirt first.

I still have a bad crush on thrift store men's shirts.  Just when I say I'm never going to work with another one I get the urge.  

They are made so well that they are a hairball to take apart!  So, I've been thinking of ways that don't entail ripping out seams.  This shirt doesn't fall into that category because I made it before I swore off that method.  It was made with a traditional shirt that had a front placket typical of many men's shirts.  I didn't want that look so instead of cutting off the whole placket I cut into it in parts to create little patches in several spots.  Then I overstitched with perle cotton.  I added old buttons that were from my grandmother...she collected buttons.  More on that family saga in another post.

I sliced one layer of the collar off to create a raw edge, love those guys.  I then cut the hem so that it is shorter in the front and back, longer on the sides.  I added a wonderful subtle striped linen for a flounce in the front and a beautiful lightweight linen from a thrift find in the back.  I cut off the cuffs and hemmed the sleeves.  The collar has a bit of the stripped linen applied to tie it together.

Then I stenciled it with The Crafter's Workshop Brocade pattern.  I used Jacquard fabric paints blending a metallic grey with white to make it more subtle.  It's a fun look although a bit flouncy for me, hence the pairing with the more bold vest with black stripes.

OK, the vest.  I seem to have the fabric painting bug and can't shake it.  Never mind, it's fun and I'm branching out.  Here I used a lightweight canvas, sort of duck or really heavy muslin from Beverly's.  I masked it off with painter's tape and spray painted it with Liquitex Professional Spray Paint.  I love this stuff.  It has a bit of a hard hand but in this particular application it's fine.  Then I spray painted the same stencil with red.

I've been wanting to try Katherine Tilton's idea of making a vest out of Marcy Tilton's jacket pattern V8430, leaving off the sleeves.  She had a terrific article in the August/September 2009 issue of Threads Magazine about making vests with exposed seams.  

I added some top stitching to the exposed seams and a few pieces of striped fabric.  Then smacked a couple of pockets on...gotta have pockets.  Oh and in the end I splattered it with watery white fabric paint to make the whole thing feel like it comes together.  Don't ask me why I think it works but I do.

I LOVE the process of not planning a garment, just winging it and see what happens.  It's such a contrast to the pattern-following thing.  I love them both really.  As you'll see in my next post where I made a Lynn Mizono shirt...by the book!


                     You can see that I'm not too neat with the spray paint.  I like it that way.


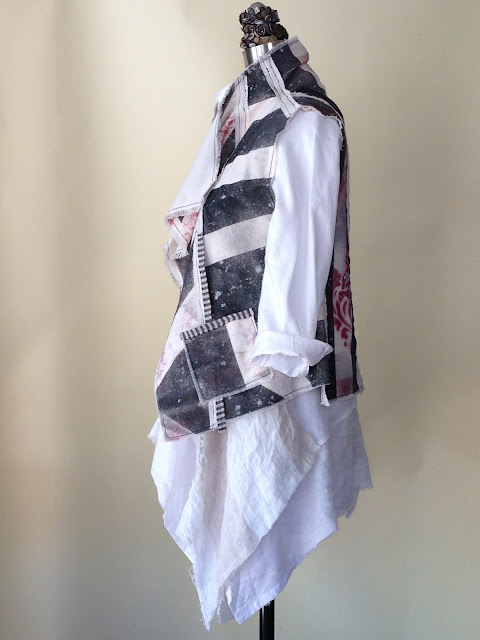
Oh, and after I got the shirt done I found a stain on it!  Hate when that happens and it's a               chance you take with thrift store finds, they seem to show up even after washing.  So, I did an Alabama Chanin thing that you can see just a bit on the left sleeve above.


Lynn Mizono Top

$
0
0
I've had this Lynn Mizono's pattern in my to-do pile for over two years. It kept working it's way down the pile.  I cut it out over a year ago but never found the right fabric.

V1274


 I first saw Helen Papke make it in various gray fabrics; silk, cashmere, safety pins(!) as a jacket.  I'm sorry to say I can't find the photo but if I do I'll post it.  Magical garment!  Here's a photo of the unsinkable Helen at one DOL.  She made the shirt draped over her chair.  The buttons are felted lips.


I've considered several ways to make it but, as per my usual method, I chose a fabric for the first go 'round that I wouldn't mind messing up.  I can't remember where I bought it, I'm sure it was online because I remember when it arrived I said to myself, "Well THIS isn't what I thought it was going to be!" But it's turned out to be a really nice fabric and easy to work with.


It's a lightweight synthetic black and white stripe with a semi-permanent wrinkle.  When I say semi I mean when you wash it the wrinkles stay; when you iron it the thing goes flat.  A problem if you don't know in advance.  But, it worked well for the facing pieces, made them lay flat, I liked that.

I made the longer version, using the selvage for the collar and vintage 30's buttons.  I narrowed the sleeved.  I don't like bell shaped sleeves, they get in my way.   I love this pattern.  It's well written and worked the first time.  You know that doesn't happen often!

I'm going to make this in several types of fabric.  I have an old kimono that I'm thinking of taking apart and remaking with this pattern.The longer version is supposed to be made with shirting fabrics but I think, with the addition of pockets, it will make a great leight weight jacket to go over my long and drapy tops.

Helen made the shorter version for her jacket.  It was fairly structured because of the weight of the fabrics which was very pleasing.  She embellished it with several hundred safety pins, big wow! Dang I wish I could find that photo!


Here's the link to the pattern.  http://voguepatterns.mccall.com/v1274-products-15137.php?page_id=716.  Give it a try.


As Promised

$
0
0
If you read my last post about the shirt I made from Lynn Mizono's V1274 pattern you will remember that I promised to send along photos of Helen Papke's jacket interpretation.

Two sewing pals sent me photos they had so you can see why I love it so much.  Huge thanks to Sharon Coker, a longtime DOL attendee and travel-mate for the close up shots and to Steph Rich who has a very cool design/sewing blog.  Check it out here.  I've never met Steph in person but I've known her through her posts.


Above are two photos of Helen at DOL Santa Barbara 2012 modeling for Marcy Tilton who had them on her blog following the retreat.


Close ups provided by Sharon.  I'm so happy to have these.


In the photo above you can see one of the back options of connecting the two side "tails"


Now you see why I (and many others) channel Helen when we sit down to design something.  She's fearless and hugely talented.

Men's Shirts into a Vest

$
0
0
I can't seem to get away from using thrift store men's shirts to make women's garments.  It probably has something to do with my need to use what I already have.  And, I had lots of pieces left from the dusters and vests I made for Karen Melfi Collection in Santa Fe.

I've had the pleasure of selling some of my garments in this wonderful shop over the last couple of years.  I send them mostly things made from men's shirts.

I also sell redesigned cashmere sweaters at Many Hands Gallery here in Capitola, right next to my bakery.  I'm starting a few of these garments tomorrow and will post them before I send them off to find new homes.

Being able to sell some of the garments I make has been great because I can't wear everything I want to sew.  I like sewing for it's own sake and love to make things I know someone, somewhere in the world will love to wear.

I used to sell to two stores in Carmel for years but both have sadly closed their doors.  The shop owners would tell me stories about the women who came in from different countries and buy a sweater.  Just to think about someone walking around 3000 miles away in something I made gives me a hoot!


Here's a little vest I cooked up out of my current favorite color, orange.  I paired it with a subdued taupe Babette top that I think gives it more....what's the word....dignity?  No, that's too lofty.  But it does ground it a bit, I think.


Here are a couple other angles.


What do you think of this pairing?  I loved Sham's (at Community With Fabric) recent post about what to wear with a garment she had just finished.  I think feedback like that is so valuable.  Here it is without anything underneath.


Maybe all it needs is a little lightweight white tee?  Or maybe I should sell it!  Feedback gladly accepted!  Now out to pick the gazillion zinnias in the garden!

Another Vest

$
0
0
I'm obsessed with vests.  They're my go-to sewing/design project when I want to make something I KNOW I'll wear.

I've made them out of fleece; big drapy ones that I wear in the winter.  I used to embellish them but now like them a bit more austere. You can see a few by clicking on the Vest page.

About four years ago at Design Outside The Lines I fell madly in love with a black vest Marcy Tilton bought in Paris.  I keep hoping she'll do a Vogue pattern from it.

Since then, I've played around with drafting vest pattern.  My standby is 3/4 length, has a zipper and four pattern pieces; front and back top and bottom.  I change it up by adding drape to the bottom and then pleating or darting above the hem to make it even; gather the hem in the back to make it pouf; change the collar, you name it.

I love working with rainwear.  I have a big pile of pieces in my stash that I have mostly gathered at Fabrix in San Francisco.  They are so cheap there it's a no brainer.  Last week I picked up two more pieces...for $2.39 a yard I always get three yards.


Here is a vest I gleaned from Marcy's summer dress pattern here.  I tried on a lightweight black version she had redrafted from this pattern at DOL Sisters this year and loved it.  I saw that others have made it into a vest as well in Marcy's summer dress design competition, see them here.

I tried it in a taupe Babette rainwear that I got from Marcy.


I love all the details in this pattern.  Especially the collar.  It stands up perfectly and it's not too high.  I'll use this collar in other garments.

The vest seemed really big, even after my pal Jenny Freedman helped me tissue fit it.  I had to take inches out.

The only other thing is that since this pattern has a lot of fullness it will be better made in a not-so-stiff fabric.  I keep looking for these fabrics that are like rainwear but lighter weight and probably not actually water resistant.  That would be fine, I'm just looking for that particular crisp, techno feel and look.

Here is Marcy's tutorial on the changes she made to turn the dress pattern into a vest.  It was in her March blog.  I used them all and they worked well.

I'll keep making vests, they work so well in my Central California Coast climate...not to mention I'm 64 and need sub-zero weather to even THINK about wearing a coat.


Speaking of Vests

$
0
0
Ok, in my last post I told you that I love vests and talked about ones I had made in the past.  That got me thinking.  So I went upstairs to the closet and pulled out all of the vests that were there.  That didn't include all the fleece models that are put away for the warmer months.

I started this blog to document the things I make so that I can share them with sewing pals and have a "file" to refer to myself.   I hauled them all over to the bunkhouse, that's the little cottage next door I use for my studio space, and photographed them.

Here they are, in no particular order.

This is one of the rare short ones.  I drafted this pattern from my longer version that I talked about in the last post.  The fabric is a Fabrix rainwear in a rusty bronze.  The diagonal zipper works well and the little pockets on either side of the front are fun, if not too functional.  I wear this over a slinky steel grey rayon tunic with a huge cowl collar and fun sewn on colored patches that my pal Janet made and gave to me.


This fabric is kind of wrinkly which I like.  It compliments the smoothness of the tunic.


I got the pattern for this vest from another sewing buddy, Lynn.  We drafted it from a RTW, took it right off her back!  I love this pattern and will make it again soon.  It's great open or closed.  I won't make it from a crinkly fabric again though, too much volume for me in the you-know-where region.


Here is one of the remade cashmeres I've kept.  Several sweaters combine to make a really comfy winter vest.


This is one of those garments I've remade a few times.  I wore it once, figured out what didn't work, then added something, then decide I didn't like everything I added and whacked off some of it.  That gave me some interesting layers.


Here's a fun summer cotton vest in a taupe/grey.  I'm wearing it today!  I wasn't happy with the plain jane look when I first made it so I asked Diane Ericson for suggestions.  She had me add the gathering at the hem and the slit up the back.  Voila, it worked.  The collar is from Marcy's shirt pattern V8709.  I think it might be out of print?  I couldn't find it on Vogue's website.


This is another combined cashmere vest that I kept.  This goes with 99.9% of every garment in my closet.


This one is out of a mystery fabric.  I can't remember where I got it but you can bet it was probably Marcy Tilton or Fabrix.  It feels almost like it has a bit of wool but I know it doesn't because I'm allergic to wool.  It's self pleated, more in some spots than others, which gave it an unusual drape.

When I was cutting out the pattern I added some inches here and there and then pleated them up.  Again, the collar is from V8709.  I use that a lot.


Here's a crazy one.  I drafted this from a Rundholz vest that yet another sewing pal, Lisa, lent me.  This was just a stupid idea from the start.  There are zillions of pattern pieces all going in different directions.

I soon veered away from the actual pattern and just started nipping and tucking until the darned thing made sense.  I probably took away more fabric than I kept.

Terry, a DOL friend, sold me the fabric at last year's DOL SB, it's a heavy grey ponte.  It was perfect for this garment, she saved me.

You can't see them but the buttonholes are sewn at a diagonal, nice effect.

I call this my tortoise alter ego vest....like a big turtle shell.


This one I'm not quite sure about.  I don't wear it often.  I made it to use up some zippers from my stash and to make something that isn't grey or black.  But....I don't wear it 'cuz it's too bright!  Another rainwear kind of fabric from Fabrix.


 Here is a drapy shorty made from a slight boucle knit from Joannes in Santa Fe.  It started as a Marcy jacket pattern V8559...I think.  I really need to keep better records.  Hopefully this blog will help.


I added a panel in back because it was too short for me.  Worked great.


This one is another rainwear fabric from Fabrix.  I wanted a cargo pocket directly on the side of the garment.

Several years ago I saw a woman walk through a hotel lobby in Tokyo who was wearing pants with cargo pockets plastered to the sides, down low.  I loved that look and have been thinking of it ever since.

These pockets are a bit on the gargantuan side but I love this vest and wear it a lot.  My standby pattern but I raised the front hem a bit and used the Marcy collar.


Now for the boo-boo.  This mistake taught me never to cut out patterns late at night.  The lighting in my studio is not the best and I cut part of this on one side of the fabric and part on the other!  You can clearly see it in this photo but thankfully in real life it's not so noticeable.  And, hey, I might have done it on purpose, right?  Who should know!

So there you are.  Now you can see how important vests are in my life.  And these are only the ones I could lay my hands on at the moment.  I have tons of RTW vests in every weight and fabric.  Almost all with pockets so I don't have to wear a purse.


Sunday Fun

$
0
0
I usually go to the bunkhouse on Sunday morning and listen to my favorite radio programs.  Foremost of which is Prairie Home Companion.  It's sort of my church.

Church used to be the flea market but when I turned 60 I just didn't need all that stuff anymore.  So now I make stuff on Sundays.

I was fishing around for something to make last Sunday.  I wasn't in the mood to create something 'big'.  I wasn't in the mood to make a basic wardrobe staple, which is usually my fall-back when I'm just not motivated.

I don't know why but I looked inside a cupboard I don't usually go to and bam, there it was.  A huge sack of garment labels I've been hoarding for years.  I take a LOT of labels out of clothes because I remake so many of them AND I rip them out of everything I wear because they're itchy.  I've always wanted to make something with them but never struck on the right idea.  Then, the right idea.


So I dumped out the bagful of labels and started sorting.  I wanted to use my favorites because who knows if I'll ever do something with the rest of them.  I had a blast.  So much fun looking at all of these labels.  Old ones, ones I've never seen before, don't know how they got in there.  But all of my favorite designers from Pringle through Dress To Kill!


You know you're doing the right thing when it all comes together easily.  And this project did.  It practically made itself.


I used a black dupioni for the base.  That's what I use on the collars I make.  Then I "shingled" the labels from bottom to top, making sure I didn't cover up any of the really cool ones.

I love it.  I might never wear it but who cares.  It will live in my studio and make me smile every time I lay my eyes on it.  Joe calls it a chicken.  He said, "There's chickens and then there's eggs.  You keep the chickens!"

I used a vintage button from my mom's collection.  I'm pretty sure it's jet.  

Everything we make should be this easy.  After I finished this...in about two hours!...I started a simple black tunic...a wardrobe staple...I'm back in the saddle!

Recent Sewing

$
0
0
Life hasn't allowed for a ton of sewing lately.  Guests, meetings, travel have all mashed together to keep me away from the bunkhouse.  But I'm back at it!  


I struck a pattern from a tunic my friend, Janet, was wearing last week.  I won't name the brand but it's one we all wear a lot.  I loved the assym lines and little drawstring at the hem.  I also love the funnel neck.  I cut it really wide so it wouldn't choke my drapy, wrinkled, very delicate neck…I used to wear tight turtle necks but ever since you-know-what I can't stand anything tight around my neck.  I know I'm not alone in this particular dilemma.


I used a fairly heavy knit I got from Marcy Tilton.  I've been asking myself why I bought it.  Seemed every time I went to use it the irregular stripes didn't work on the pattern.  But this time they were JUST what it needed to make the various aspects of the garment stand out.

Drafting top patterns has gotten so easy since I realized I could use the top part of a TNT tunic pattern for all of my new garments.  I don't bother to copy the new garment's upper part.  I just lay my TNT pattern on new pattern paper, trace the neck, shoulders, armholes and sleeves from the TNT pattern.  Then I lay the garment down on the paper, align it with the top and trace that part.  This time is was the lower body and the funnel neck.  Good 'ol masking tape comes in handy to tape all the elements together.


 This worked in one try.  I'm going to make this again and again, it's super comfy and I got lots of compliments the day I wore it.  Neve mind that I wore it BACKWARDS for the first two hours.  I finally caught sight of my reflection in a window and realized the little drawstring was hanging down in BACK!  OY.  No wonder the neck was feeling a bit tight, it was the back neck!


I'm sorry this is so dark.  I took the pics at the wrong time of the day.  Darn, because some of the details don't show up.  There is a lot of piecing of small pattern pieces you can't really see.  Maybe I'll take more and post those another time.

This vest was made with two grey tshirts I got at a trade show recently.  They are heavy men's shirts, just beautiful.  I've been wanting to copy an All Saint's vest I own for two years now.  This is the first go.  Most of the seams are on the outside, it has a big, drapy cowl neck and deep pockets that go down to the hem at the side.


I laid the All Saints vest over one of the tshirts and started cutting.  Then I draped the rest of the vest on my dress form, trying to follow the lines of the original.

This isn't truly a copy, it's very different from the original but I like it very much.  And I'm going to make more!

I'm working on cashmere hats and sweaters from recycled cashmeres right now.  I sell them at Many Hands Gallery next to the bakery.  Check out their website here.  I'll post them before I send them off into retail outer space.

Hats

$
0
0
I made a passel of hats for Many Hands Gallery.  It gives me a chance to flex my right brain on several little projects at a time.  It's good for me to practice freeform sewing in quick-time; gets the juices flowing.

I don't know about you but I'm getting tired of the word creative.  But it's hard to come up with another way to describe what we do, right?  I just looked it up in Thesaurus, they didn't come up with any better words.

Anyway, off the point.  The point is, I got going on these little cashmere sweeties and had fun.  I use the sweaters that I can't use on larger garments.  And I also use colors that I don't think would work in larger garments.


I really had fun with this one.  But it took forever to make compared to the others.  These flowers are made with cashmere scraps that I stitched into with pearl cotton and added vintage buttons.  I swirled some...stuffed some.  I love all the color against the taupe background.  A few chiffon scarf scraps added in the background bring it all together.


Here's how I usually do my flowers.  I twist vintage fabric and silk scarves into little "rosettes".  More vintage buttons.  Gotta use them, I have trillions!


I over dyed this cashmere.  It was an off white that I dyed with green.  It's kinda camouflage.  The buttons are actually vintage mattress buttons.  You know, the coated metal ones that used to poke you in the butt?


This one is a tad "Miss Marple meets Little Lulu".  I can just envision the 50's coat that button came off of, can't you?  I think my grandmother had one.  The little striped bit is men's tie fabric.


This school bus yellow cashmere was given to me by a wonderful gal from Mendocino.  A hat is the perfect use.  Most of these fabrics were cut from vintage clothes.  The button is one I've never seen before, really unusual with some bas relief going on.

Heading back to the studio now to finish some sweaters.  More later!

Small Stuff

$
0
0

It's All Small Stuff


I've been compelled to work on only small items lately.  I keep dreaming of making garments but a combination of chilly weather, holiday buying and I don't know what has driven me to make one little bitty thing after another.

All are off to Many Hands for holiday presents, I'm sure.


I took a fun eco dye class from Lorri Scott several months ago.  I came home with a collection of silk hankies, one velvet piece and a cotton jacquard tablecloth scrap, all dyed with various flowers, leaves and rusted bits.  I've been wanting to make them into something but couldn't figure out how to make all the disparate pieces come together.

So, I went into my stash and found some bits and scraps that I've collected and been given.  It all came together nicely.  Looks rather Japanese in a way, I think.


It drapes really nicely and because of the silk we be warm despite being lightweight.


This view has a piece of silk on top, dyed with who knows what, I didn't keep track…sorry.  The middle strip is a sliver of silk knit a friend gave me.  The bottom is the tablecloth.  The jacquard gave it a nice texture.  On the right side you will see a length of Talbot tie fabric.


This silk piece was dyed with eucalyptus leaves and safety pins.  Love the colors and shapes.  The netting is from a large piece I got in Morocco.  It's cut from a hamam scrubbing cloth.  I have several of these I bought in a Taroudant bazar.  They're in various shades of burnt sienna, burgundy and melon…love them!  The lower piece is the silk.  Takes the colors so well but is such a bear to sew.


Close up of the safety pins.


Another close up.  I think the plum color was…oh I give up, I can't remember!


Using my cashmere again.  I never tire of working with it.  And there are so many great colors available in second hand stores.  I'm trying different color mixes using various contrasting strips for accent.


Been using both my serger and sewing machine.  I like both looks.  


These are satisfying to work on because each one is a little painting.


A beret using a pattern that has a larger profile than I've used in the past.  I still love using vintage scarves and buttons for embellishment.
OK, here's a confession.  I just bought the new Baby Lock Serger with the big floor.  Oh boy.  It's wonderful.  It won't replace my old Baby Lock Evolve, I love that little guy.  But this one allows me to sew larger pieces together using the cover stitch.  Here I used it for the top of the hat.  Sorry, these pics aren't so great, you can't see the detail in the patched top and the vintage black buttons in the center of the "poufs"

More to come soon, I'm on a roll!

More Cashmere

$
0
0


Here are a few more items I've made for Many Hands.


This sweater was made from several over-dyed cashmeres.  I still love the drapy look because it's so attractive on so many figures.


 Back view


I forgot to take photos of this scarf and sweater while they were in my studio so I took them at Many Hands.  Sorry, not great photos but since I started this blog to document what I've made I wanted to get them in here!


Another scarf that didn't get shot in studio.  There's nothing like cashmere around your neck on a cold day!


Polartec Lined Raincoat

$
0
0
Until about a week ago it's been unusually cold on the central coast of California.  I kept going into my (very stuffed) coat closet to find something warm enough to wear.  There was not one piece I felt like putting on.  All of my choices were lightweight for our usually mild winters.

Last week I finally got time to begin my new winter coat.  Problem was, we were having a heat wave!
And my little studio isn't insulated so the indoor thermometer read 80 degrees!

But I forged on, sweating all the way.

My fitting guru, Jenny, helped me shorten Marcy Tilton's V8934.  I used a Seattle Fabrics DWR Supplex 100% nylon in a grey/black.   I lined it with a very thin Polartec in black.


It doesn't look like much in the photo but I'm going to get a lot of wear out of this coat.  This fabric will travel well.

I vacillated on which front band closure I would use.  View A showed buttons and view B was a fly front with hidden buttons.  I went with View A.  I worried about making buttonholes on that rainwear...in fact, all night one night...stupid, right?

So I went with the idea on the pattern, using little patches of fabric to highlight the buttons.  I used a stretch black and white denim.  Worked great.  It gave a little detail that the coat needed.


I waited on which fabric to use for the collar lining.  I figured I wouldn't want the Supplex against my neck but wasn't sure how the black would look on the inside of the collar.

When I got to that point I auditioned both fabrics and the black looked fine.  So glad.  Feels wonderful.

There's not much to the back of this garment but I had the photo so why not show it?  Those two little white spots are just the sun peaking in from the window, not a design element!

I like this pattern very much.  I'll make it again.  The coat took longer to make than I had figured.  About 20 hours total.  But I'm a slow sewer and I took my time since I hadn't lined a garment in 38 years!  Most of my clothes are knits.

I don't usually count the hours I have into a garment...not the point, right?  But I was curious about this one and so I counted.  20 hours well spent listening to Donna Tartt's The Goldfinch.  They both took around the same amount of time!

Stretch Denim Jacket

$
0
0
I wear a lot of tunics and never seem to have the right coat or jacket to wear with them.  I previously made a version of Katherine Tilton's B5891 (you can see it on my Coats and Jackets page) and liked it very much.  But it is too short to wear most of the time.

So, I lengthened it by 4 inches and gave it another go.


It looks a bit denim colored in this photo but it's a wonderful black with white threads running through it.  It has just enough stretch, totally bulletproof.


Sorry this photo might be a bit dark.  It's a hanging pocket I learned in a recent class with Sham's.  I love the shape.

This is such an easy  jacket to make.  I encourage you to give it a try.  The collar and shaping are so flattering, too.

Field Trip!

$
0
0
A few sewing pals met up last month to hit the San Jose area for a few sewing/design highlights.

First, we visited Fabrics R Us.  It's a whacky, stuffed to the rafters store with everything from Ice Capades costume fabric to cowboy flannels.  Needles to say, we found stuff we couldn't live without.

Here's a trunkload, just a few.


Here's a mermaid piece that Lisa found she couldn't live without.


And then, we all found this cool "Vegan Leather"...yeah, that's the new name for pleather!  Cut out, black, yep!  And on the way to the checkout we found this black garter strip.  I've decided I'm coming back as a dominatrix.  We'll see what everyone does with this stuff.

Then we ate, gotta eat!  Landed at a wonderful downtown Vietnamese restaurant named Vung Tau.  I highly recommend it.

After that we visited the San Jose Textile Museum for it's new show on the history of Wearable Art.  It's worth seeing.  Here are a few photos from the show.


Mandala-like sculptures by Isaac Amala and Liz Simpson made out of ties.


Here's Lisa enjoying a huge tent made of ties by the same artists.  Just amazing.


Another wall sculpture.


Copper wire knit into long garment sculptures by Laura Raboff.  The lighting created the most magical shadows that reminded me of the Ruth Asawa corridor at the deYoung Museum in San Francisco.

THEN, we just hadn't had enough so we went up to Mountain View to FabMo for a one day sale of 100+ bolts of designer fabrics.  We had to wait in line for about an hour.  We waited behind this cool gal.


She and her friend were dressed in their own creations that were mesmerizing.  We all had a blast.  Found lots of fabric at $1-3 a yard!  Even though we entered the warehouse about two hours after the sale opened we still found some great stuff.

I bought 5 yards of a green wool to make a Chanel-style altered jacket.  Will try to figure out how to make it look French while still looking edgy.

It was the best day.  Hanging out with my sewing design pals eating-looking-buying.  Doesn't get any better than that!

More posts to come soon.  I just returned from DOL Santa Barabara with Diane Ericson and Kay Khan.  Inspiring and productive, as always.  So that will be one post.  Another will be on some necklaces I've been making lately.  Talk to you soon!

DOL Santa Barbara and neck bling

$
0
0
I just returned from Montecito where Diane Ericson and Kay Khan held forth on their latest textile ideas.

It was a great group of women.  Sixteen of us worked our way through ideas we brought and new ideas that Diane and Kay introduced.

This is going to be a long post so hang on!


Here's Diane Ericson demonstrating one of her techniques.  She's wearing her latest remade men's shirt creation.  Each one is more inspiring than the last.  She's a genius mix of left and right brain, engineer and artist.


We met Kay Khan, a Santa Fe fiber artist.  Her work is incredible.  Mostly constructed vessels and wall hangings but she also makes jewelry.  She brought several pieces to sell that were swooped up quickly.


Her work takes time...and lots of thread!  Very intricate pieced textiles with lots of wording.


She worked on a men's jacket while at the retreat.  Cutting it, sewing into it, really inspiring.


The holes she cuts in her pieces got a lot of us thinking!


A finished hole...or not.  She keeps working into her pieces so you never know if it's really finished.


These are two pieces she made out of sweatshirt hoodies.  Stand alone helmets that were so powerful both thematically and in their construction.

An example of her jewelry.


And then there's Helen Papke.  A long time DOL attendee.  Here she's working on a piece of her own boro.  Her inspiration...a shop in Venice California selling pieces of clothing made with the Japanese textiles.


Not yet finished piece she sewed to a men's shirt.


And then I got going on a piece inspired by Kay.  She was very kind to help me construct a collar/necklace from a 12X15" piece I made.  Here's the start.


And here's the finished piece.  It's big, it's kinda cartoon-y but I like it for my first attempt.

View of the side/back

View of the other side/back

And then here's the piece I bought from Kay.  So fun and wearable.


We ate one night at Los Agaves in Santa Barbara.  It's my new favorite Mexican restaurant hands down.  Great service, gorgeous presentation and terrific food.  Here is my Green Pozole, delish.


Now I'm done with the DOL recap.  Here's a few shots of other stuff I've been working on.

 I took a class in October from Sandy Ericson of The Center For Pattern Design on making paper beads that are folded, Swedish style, into little origami type beads.  I sort of stink at it...still...but love the process.  

I started the necklace with the beads in a single layer but realized it needed some depth.


So I restrung it.  I don't love the old covered wire I used, need to find another something to hang them on. 


Don't look to closely.  Sandy, if you are seeing this I'm sorry, they are NOTHING like yours.  I still have a long way to go in making them tight little square bundles.


Then I worked on a copy of a necklace my friend got overseas.  It's a mix of covered plastic curtain rings, painted wooden beads made of dowels and painted plastic rings.  I covered the rings with ribbon, vintage kimono cloth and yarn.


It was like reinventing the wheel but I love the outcome and I wear it a lot.


It gets crazier and crazier.  This is a scarf I knit from strips of vintage scarves.  I have hundreds that I've collected and want to use them.  It became a collar of sorts.  Doesn't look that good as a scarf but wound around my neck it's pretty interesting.


And warm!


One Day Wonder

$
0
0
Some times you just gotta sew something you know will work and have something to show at the end of the day.

I had just that kind of day last Sunday.  The weekend had been a total bust, sewing-wise...in fact, the last two weeks have been just that.  Starting projects that can't be finished for one reason or another.  Either it was my skill level, the pattern or just plain had no desire to work on the project.

So, on Sunday I decided to finally try M6607.   Margy from A Fool For Fabric gives it the TNT status and I saw her whip one out in about an hour a month ago.  This sleeveless tunic always looks so good on her I wanted to see if I could wear it, too.

I made it from a fabric that a friend gave me, thanks Sarah!  It's a black and reddish brown burnout, very drapy and I had lots of it...nothing to lose.


It worked!  This is such an easy pattern; fun to make and instant gratification.  It was so fast that I had more time so I pulled out a sheer stretch jacquard in a smaller black and brown print and made Christine Jonson's leggings to go underneath.  I can see why Margy loves this so much.  

I pulled the outfit together with a sheer stretch netting tunic I made a year ago.   I'll need to wear a black camy under that.  Cant wait to wear this new outfit!

Sleeveless Tunic

$
0
0
Thanks to two sisters, Mary and Patty, some of my best sewing pals, I got a pattern for this sleeveless tunic.

I've been wondering what to call it, a vest or a sleeveless tunic.  Still wondering.

But here it is.  I decided to use scraps on the first one to try out the pattern.  The original tunic was bought by Patty and drafted by Mary.  She sent me a copy, an impeccable copy, and I got right to it.  I did a tissue fit and it needed a few tweaks.

Jenny, my friend and sewing mentor, helped me make some minor adjustments to the pattern.  I'm full busted and if I don't take out some fullness under the bust area it creates a shelf that makes me look huge.

She took a couple of tucks under the bust, sort of darts, and we just taped them down.  It worked well, as usual.  I always have to make that adjustment.  Sometimes it's more than can be eased into the garment so darts are needed but I prefer not to have them, if possible.


Black, grey and white always work in my wardrobe and those colors make up the bulk of my stash so I had lots to choose from.
So why not use a different fabric on each pattern piece?


Now that I have the pattern fitting well I'll make this again.

Thanks to Patty, Mary and Jenny!

Fun New Vest (yes, another vest)

$
0
0

Sorry it's been so long, sometimes getting into the sewing studio is just not in the cards.  Seems I've been doing some sewing lately but it's mostly hats for sale and working on future patterns.

One exciting thing I'm working on is a long range project.  I've decided to do a French jacket after the designer who's name shall not be spoken.  I was drawn into the idea by Patty Van Dorin in her Rambling Rose blog entitled French Punk.  She made the cutest patchwork French jacket that hooked me in one second.  You should follow her blog, it's terrific!

Making these jackets is a commitment because you have to fit the pattern, make a muslin, fit the muslin then make the jacket.  They say it's about 70+ hours.  Fine with me.  I'll just do it over several months.  I"m not really interested in doing a jacket like the originals, very formal and not suited to me or my lifestyle.  I am, however, very excited about building fabric from treasured scraps.  I've done the tissue fitting and will cut the muslin today.  I'll keep you posted.

I've also made a couple simple tunics from my existing pattern stock.  I'll take photos today and show you soon.  

Here you see a vest, like so many others, the pattern for which I got from a DOL sister.  It's a self drafted pattern so I'm sorry, it's not available, she isn't a pattern designer, per se.  This is my first attempt at the pattern.  Next time I'll make it a bit longer and give it more shaping at the waist.  I'll also work on matching the exposed seams at the side seams.  Love the exposed seams, I'd like to find some acid washed sweatshirt fabric to use next time.  Anyone have a source for that?

This version is made from a Marcy Tilton double sided heavy French terry, sort of a sweatshirt knit.  It's soft, very comfy and I wear it a lot over tunics.


Summer Sewing

$
0
0
I'm back in the sewing room after a few weeks of meandering through life's little diversions.  It feels good to make some useful garments and use pieces in my stash.

This first piece is made from one of Marcy Tilton's trios I picked up at a DOL retreat.  I love the way she puts three color coordinated knits together and makes it so easy.  I've used them in tunics and dresses with great success.


This trio is in one of my favorite colors...green!  Acid green to be specific.  A very fun tunic from a great designer, Katherine Tilton.  She's now designing for Butterick.  I've made this three times and wear them constantly.


This time I didn't sew a hem, just left the bottom raw.  Even the double thickness pocket is raw which gave it a great detail, showing both fabrics at the bottom.

I find that the neckband is the trickiest part of knit tops.  Every knit is so different.  The trick is to play with it and don't be too impatient.  I sometimes audition 4 or 5 ways to apply the neckband.  There are so many methods.  Maybe I'll do a blog tutorial on the different ones someday...when I get it together!

This neckband was applied after one shoulder seam was sewn but before the second shoulder seam was sewn.  Sometimes this looks good and other times that seam just bothers me.  In this stripe knit it was somewhat concealed so I went with it.

Here's another tunic from a Marcy fabric that I picked up while visiting her shop (open to the public by appointment.   Keep in mind it is not easy to get there but worth it!).  It's a hanky weight jersey sewn in a self drafted pattern from a friend's RTW garment.


This is the second one I've made.  The first one was so successful I plan to make many.

That's all for now.  But I have two other blogs coming up.  One on an epic fail and one on Marcy's new dress pattern that I love, love, love!

Soon!


Dress For Summer

$
0
0
I'm getting ready for DOL Ashland.  It starts with a road trip from my Central Coast of California home.  I pick up Lisa here in Santa Cruz,  head up Highway 101 to pick up Helen in Ukiah, over the mountains onto Highway 5 to pick up Annie and then on to Ashland.

The excitement starts building about a week before.  Deciding what to bring, what not to bring I should say.  Every retreat I vow to bring less.  And I'm getting better each time.  This time, with four of us in the car I'll have to tow the line.  Confession, I bought a roof rack for the car!  Just in case!

One of the fun preparations for these clothing design retreats is deciding what to wear.  It's fun to dress for women you know will appreciate it.

I've had time to do a bit of sewing these last two weeks.  Here's Marcy Tilton's new dress pattern I tried in a trio of knits I bought from her at another retreat.  These trios are such a great idea.  I just pick up the package from my stash and it's ready to go.

Sorry, these pics aren't better, I think I need to finally bite the bullet and actually get a camera instead of using my IPhone.


This is made from a white and brown stripped knit in front, one of the trio from Marcy.   The pockets are a burnout knit I got from a sewing pal and the sleeves are a sheer patterned knit that was in the trio.


I made a pair of leggings out of the sheer sleeve fabric and wore them with it.  I'm just not feelin' that great about totally bare legs these days, u-hum, if you know what I mean.  Leggings feel like a security blanket!


The back is from the last of the trio of knits.  It's a puckered lightweight knit, not the easiest fabric to work on.  I did a fairly good job of matching the stripes on the horizontal but the angular strips really suck.  But, hey, that's ok, they're in the back and I can't see them!  You can see a bit of the burnout used on the diagonal bottom piece.

I know I say this frequently but I'm really not a good technical sewist.  I'm not fishing for compliments here, I know my limits.  I'm getting better, slowly.  Stripes are something I haven't tackled a lot.  My strong point in sewing is diving into projects with abandon and not worrying about the perfection, just having fun.  And that's big, I think.  It's really why I sew; to be creative and have fun!

I do love this pattern.  It's like a puzzle but so easy to figure out.  It all went together well.  The final step is bringing the pocket bottoms and hem together to form the draping you see in the first photo.  I like it but you can leave it out.

I will be making this dress again, soon!  Very wearable and flattering.  I finished it last Sunday afternoon, wore it to a party where I got lots of compliments.


Here's my new pincushion that I am mad about.  My friend Suzanne made it for me after I coveted the one she made for herself.  What a sweetheart, eh?  I can't tell you how much I love this.  There's something about the colors and texture that brings joy to my heart every time I lay my eyes on it.  It's filled with crushed walnut shells that make for a very good feel when you push a pin into it.

It's going to Ashland!


That's all for now, I'll report on DOL upon my return.

ps, the epic fail is on it's way.  It's just more fun to show stuff I like!
Viewing all 115 articles
Browse latest View live